Various screen types can be connected to the system for various purposes. In a hospitality-setting, dedicated hospitality-models from major vendors are supported.
¶ Supported TV screens
¶ LG
¶ Europe, Middle-East and Africa
¶ North-America
Supported_Screens_LG_North-America
¶ Asia-Pacific
Supported_Screens_LG_Asia_Pacific
¶ Samsung
¶ Europe, Middle-East and Africa
¶ North-America
Supported_Screens_Samsung_North_America
¶ Asia-Pacific
Supported_Screens_Samsung_Asia-Pacific
¶ Philips
¶ Europe
¶ North-America
Supported_Screens_Philips_North-America
¶ Asia-Pacific
Supported_Screens_Philips_Asia-Pacific
¶ Bang & Olufsen
¶ Installing Hospitality TVs
To set up a hospitality-screen follow the instructions at:
https://setupmy.tv
¶ LG
¶ Europe, Middle-East and Africa
Find detailed LG installation instructions here.
¶ North-America
Find detailed LG installation instructions for North-American models here.
¶ Samsung
¶ Orsay
Find detailed Orsay installation instructions here.
¶ Tizen
Find detailed Tizen installation instructions here.
¶ Tizen TEP
Find detailed Tizen TEP installation instructions here.
¶ Philips
¶ Android
Find detailed installation instructions here.
¶ Bang & Olufsen
Find detailed B&O installation instructions here.
¶ Authenticating a TV
To connect a screen to a site the screen will need to be authenticated. There are two ways of authenticating hospitality-screens with the system:
¶ Using a PIN code
Generate an install code from the TV -> Install Codes section in the portal if you don't already have an install code. An install code can be used to install any number of screens for the duration it is valid. Install codes can at most be valid for one week.
We recommend deleting the install code once you are done using it.
Select the installer code option from the initial install screen displaying on the TV:
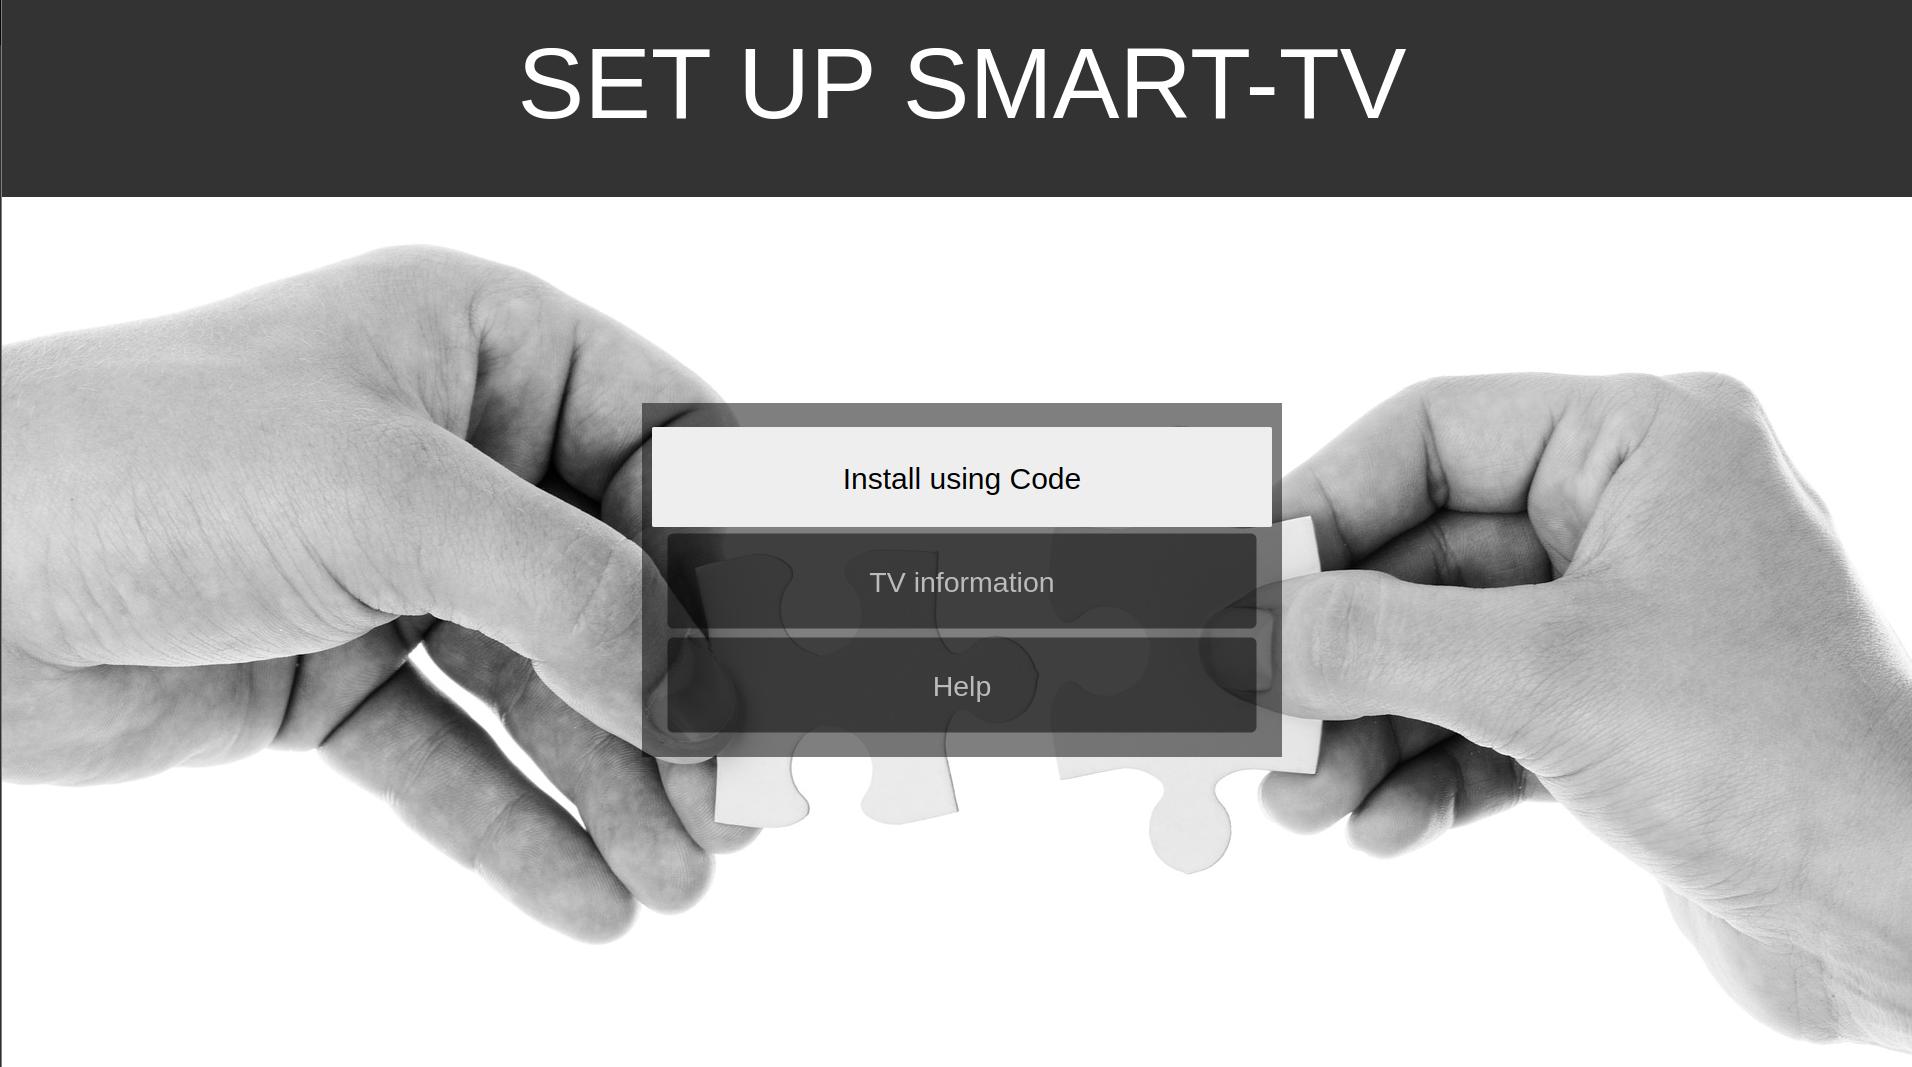
During the next steps insert the room address and PIN code to register the screen.
¶ Pre-registering screens
For large scale industrial roll-outs pre-registering screens can be a good option. Screens are pre-registered by their serial number. This can be done either via an API-call or manually by using the add button under TV -> TV Screens:
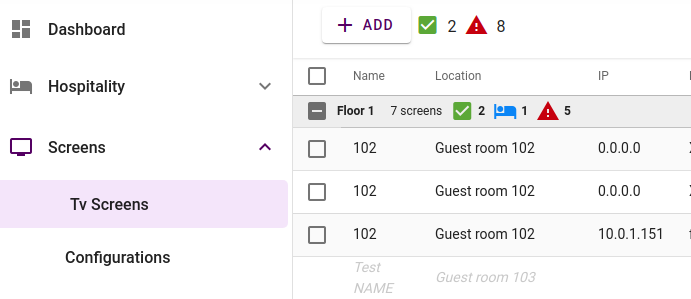
The Add dialog will pop up as shown below and you need to fill in the three fields. First one "Client ID" is the unique identifier for the TV, usually the serial number. The second is a friendly name for the TV, if left blank it will default to the room number. Last is the room number to pre-register the TV to.
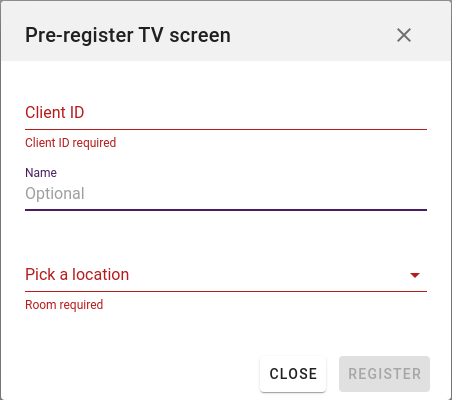
When TV is successfully pre-register just configure the TV either by a clone file or set it up according to the model installation guide and it should come up automatically on this site.
IMPORTANT: Pre-registration MUST be done before the screen is connected to the system.
¶ Managing Hospitality TVs
The main screen management tool can be found under TV -> TV Screens.
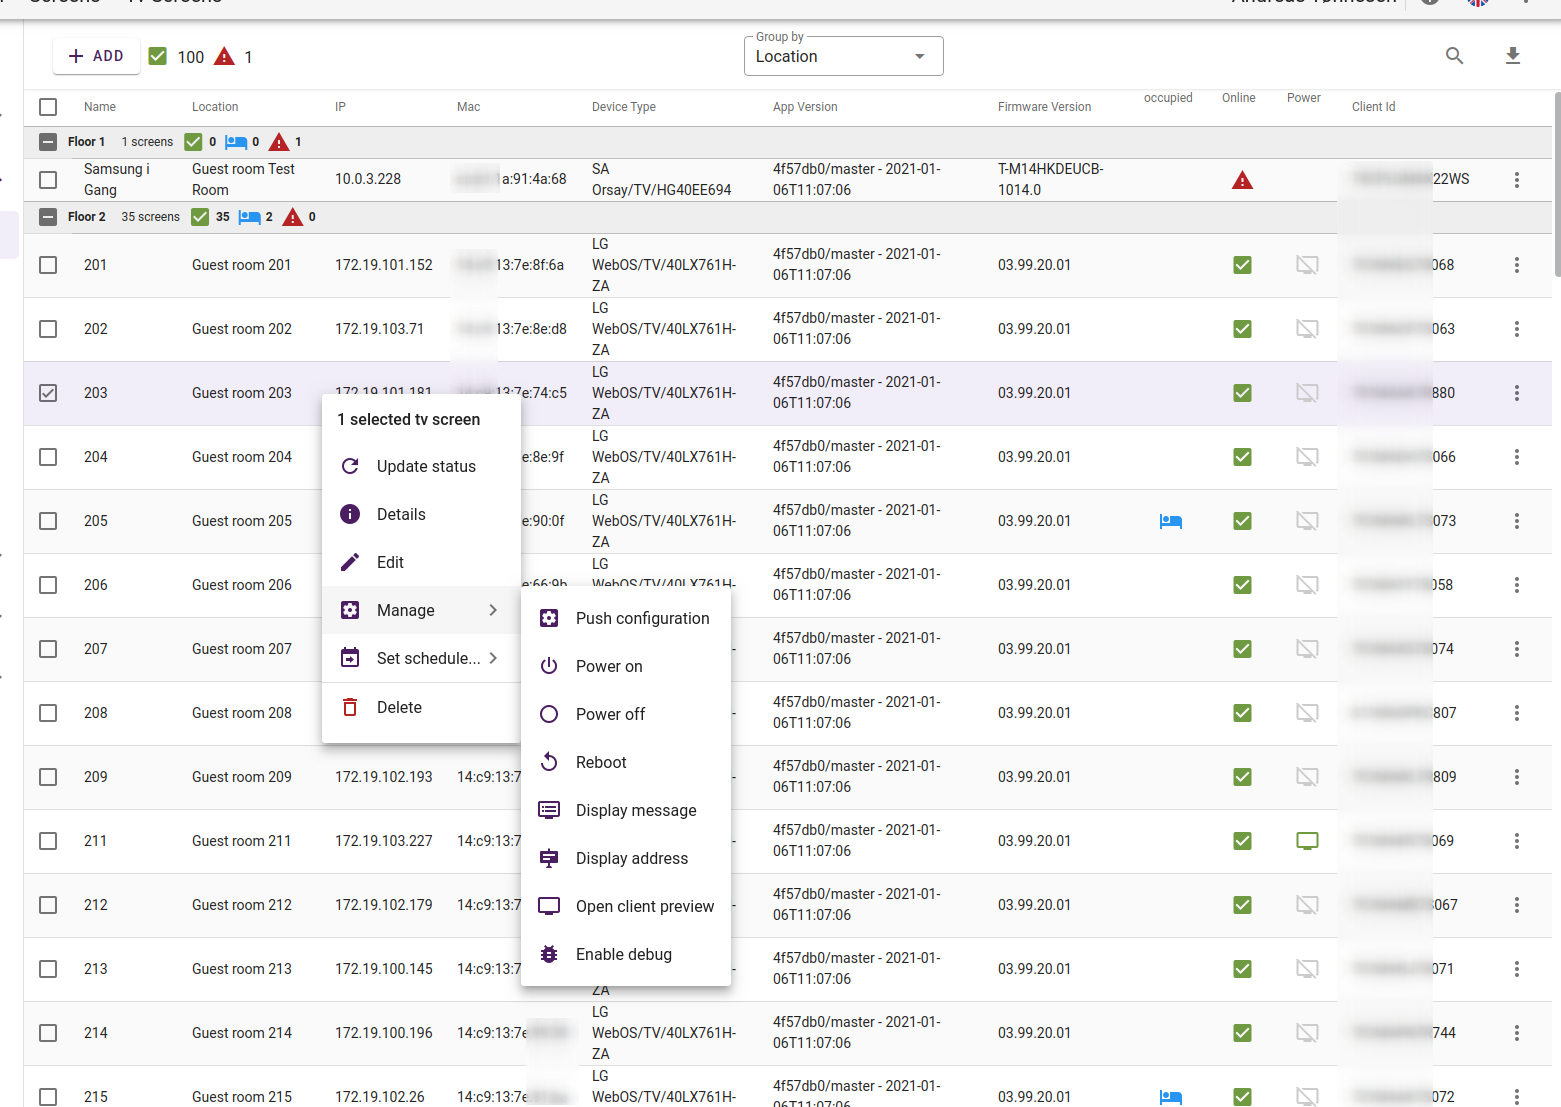
This is a powerful status and management page that will allow you to monitor screen status real-time, add new screens, edit existing screens and remove screens.
¶ Context menu
Right-clicking an entry will bring up the context-menu. This menu will have more options if one single entry is selected than if you have selected multiple entries as certain operations are not allowed or possible on multiple screens.
These are all the actions in the TV-screen context menu:
- Update status
Force the TV to report status instantly.
- Details
Open the details view.
- Edit
Edit the TV label and location.
- Manage: Power On
Powers on the selected screens. Instant.
- Manage: Power Off
Powers off the selected screens. One can optionally send a message that will display on the screens for some seconds prior to powering off.
If no message is set the operation is instant.
- Manage: Reboot
Reboots the selected screens. The operation is instant.
- Manage: Push configuration
Pushes the TV-configuration to the selected screens. Causes TV to re-display any visible menu.
- Manage: Display Page
Forces the TV to display a specific menu page. Only has an effect on TVs that are powered on.
- Manage: Tune channel
Force TV to tune to a channel. This will make the TV display the main TV-channel page.
The TV will only respond if the selected channel exists in the TVs current channel-table and the TV is powered on.
- Manage: Display Message
Display a text message on the screen for a given duration.
- Manage: Show address
Displays the TV device ID and configured location address if set. Useful during installation/troubleshooting.
- Manage: Open Client Preview
Opens a client preview that behaves like the TV in your web browser
- Manage: Send Management Message
Opens a prompt to send device-specific management message to TVs.
See list of available commands below.
- Set Schedule
Expands a menu of available configuration schedules. For easy settings of configuration schedule of one or more screens.
- Move Screen to Site
This allows you to transfer the selected screen(s) to another managed site.
- Delete
This allows you to delete the screen from your site. This will delete the screen authentication and all configuration and the screen will no longer be able to connect to the system. The screen will have to be factory reset.
Deleting a screen is a final operation that cannot be undone. To get the screen back into the system it will have to be factory-reset and installed as a new screen.
¶ Management commands
For hospitality TVs:
| Command | Description |
|---|---|
| Force Update | This will trigger Philips and Orsay screens to immediately reload the application without any reboot |
| Firmware upgrade | For Tizen this requires a BEM-file to be hosted on a web-server reachable by the TVs. The file name, version and filesize (in bytes) must be set in addition to the URL of the BEM file. |
| Set NTP Server | Only for Philips. Use with caution - if you set an invalid NTP server the internal clock will stop work and the TV won't be able to make HTTPS requests meaning that will not get internet connection anymore - this will require physical presence to fix. 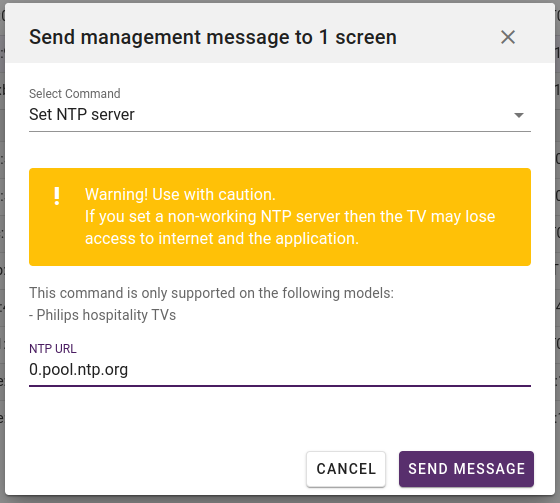 |
| Set H.Browser URL | Only for Samsung Tizen TVs. The TV will immediately power off and install the new wgt. This process will also disconnect it from our push server so it’ll appear as offline/unreachable in the portal. It must be powered on again using a remote control. Click here for more info |
| Clone update (TIZEN TEP) | 1. Clone the TV to a USB stick. 2. Open clonedata and find the file called CloneEncrypted.sclone3. Upload the file to a webserver 4. Enter the URL to the sclone file in the dialog window 5. TV will now download the file and start the cloning process, wait a few minutes. |
¶ Details View
Double-clicking an entry or selecting the details entry in the context menu, causes the details window for the given screen to display.
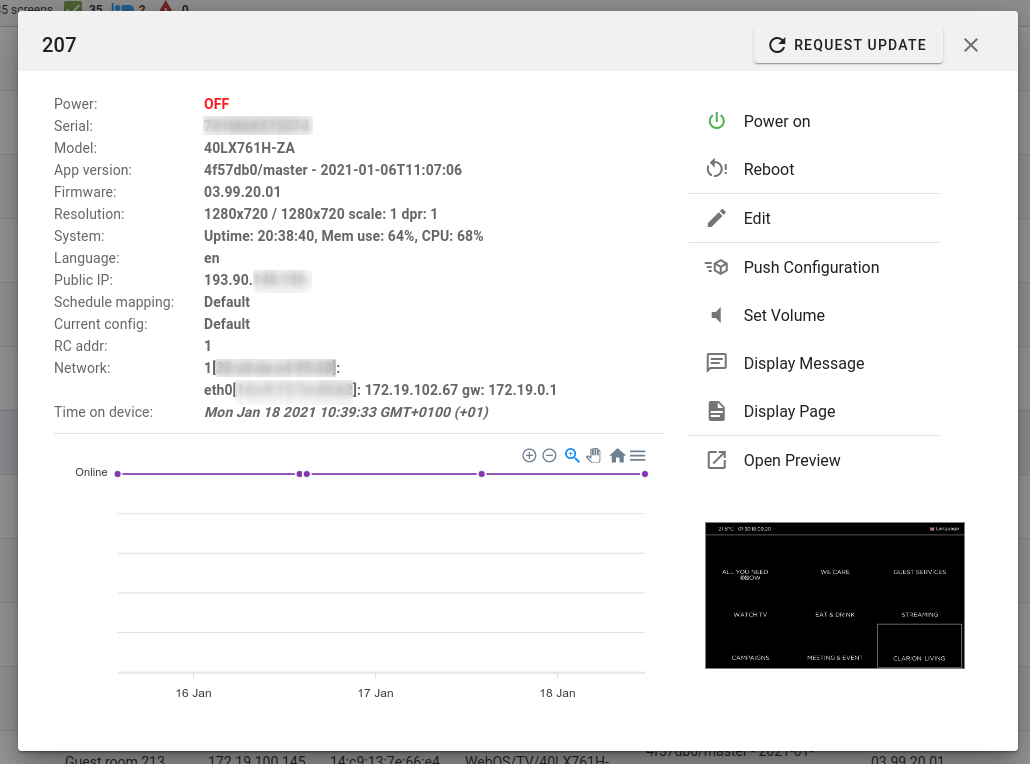
This view provides status-information about the screen, including connectivity history and a screenshot. Also, most of the management functions found via the context-menu are available directly from this view via the right hand buttons.
A new screenshot can be requested by simply clicking on the screenshot area.
The ability to take screenshots varies from TV-type to TV-type. Some models allow full access, while others may only render the textual elements visible. Regardless, this feature can be used to understand the current state of the screen.
NB Video will never be part of the screenshot. If the user is watching full screen TV/video, the image will appear all black.
¶ Offline Mode
When a TV that has been registered and provisioned by the system boots without Internet connectivity — or is otherwise unable to connect to the service — it will revert to a locally saved version of the menu page. This is known as the offline menu, and can be explicitly configured. If not explicitly set, a default version will be used. The TV-channel menu is also stored on the TV and will be accessible in offline mode.
¶ Design Considerations
The offline menu must be designed to function independently of external resources. This means:
- No remote images
- No special fonts
- No linked content that requires an online connection
Keep the menu simple, with only basic information and features enabled.
¶ Important Notes
Philips xx14 series screens will boot into the native Philips dashboard if offline at startup.
It will retain the last used channel layout. To return to the app, the screen must be powered off and on using the remote control or power-cycled.
This will also be handled by the daily reboot, if enabled.
Pages or content linked from a cached page will not work in offline mode.
Images are not cached, so the visual presentation of the menu page is very limited while offline.
When connectivity is restored, the application will automatically reload the configuration. All images and links will resume normal functionality.