The installation has do be done from a factory clean mode. If the TV is fresh from the supplier the TV can be installed directly. Otherwise, you have to do a factory reset before you install the TV.
To use the built-in chromecast function in the Philips Android screens, see this page
¶ Mandatory Settings
These settings have to be configured for the TV to work correctly.
¶ Initial settings at power-on
The TV should not be connected to any RF-network when doing the initial settings.
Power on the TV
Skip Initial Cloning
Set Room ID to < Room Number >
TV Enters the Professional Settings Menu
¶ Settings in Philips Professional Settings Menu
¶ Guest Management:
Guest Profile: OFF
Clear User Data: CheckIn and CheckOut
Display Guest ToS: OFF
¶ Switch On Settings:
Feature Settings - Switch On Feature: Dashboard
Channel Settings - Switch On Channel: None
¶ Features:
¶ Welcome Screen:
Screen Saver as Welcome Screen: No
¶ Welcome Screen Configuration:
¶ Configure:
Set all options to OFF
¶ Channels:
¶ Channel Settings
Enable MHEG: NO
Enable Hbb TV: NO
MHEG setting is no longer supported or present in the settings on xxHFL6025 models.
¶ Date and Times:
Source: Automatic NTP
¶ Time Zone Settings:
Time Zone Country: < Your Country >
Time Zone Region: < Your Region >
¶ Wireless and Networks:
¶ Control over IP:
¶ WebServices:
TVDiscoveryService: ON
ProfessionalSettingsService: ON
IPUpgradeService:ON
PMSService: ON
SystemStatusService: ON
¶ WebListeningServices
PowerService = ON
TVDiscoveryService = ON
IPUpgraderService = ON
PMSService = ON
Port Settings = 9079
¶ Advanced:
¶ Power:
Power On: Standby
Standby Mode: Fast
Standby Delay: Off
Auto Standby: Off / 0
¶ System Settings:
WLSViaCDB: ON
¶ Dashboard:
¶ Select Dashboard:
¶ Custom Dashboard( Browser based):
Source: Server
Server Settings: Server URL = "https://setupmy.tv"
Reload Dashboard After Network Restore: YES
¶ Fallback:
Fallback: OFF
Exit the Philips Professional Settings Menu
Restart the TV by powering the TV off and on.
Install TV using preferred method and follow instructions on TV
¶ Optional Settings
These setting are not needed for the TVs to work with the system.
¶ Adding Native Applications
Native applications must be requested from your system vendor. When requested you’ll receive a “Profile” to use in the following decription. (Must be done before cloning to get on all TV):
Enter the Philips Professional Settings Menu:
Press "319753-Mute" or "Mute-left-right-up-down-ok" on the remote in order to enter the
¶ Professional Settings:
¶ Features:
¶ Apps:
¶ Smart TV Server Settings:
Smart TV Mode: Profile
Profile Settings:
AppControl ID Type = Manual
AppControl ID = 563
Profile Name = < Your Profile Name >
App sync will start automatically and the applications will be available shortly after
¶ Factory reset
A factory reset must be done, if you have a TV configured on an earlier system, and you want re-configure the TV.
Enter the Philips Professional Settings Menu:
Press "319753-Mute" or "Mute-left-right-up-down-ok" on the remote in order to enter the Professional Settings Menu
Select Reset - Reinstall TV
Confirm reinstallation
TV will power off after reset.
¶ Cloning
Cloning allows you to do all the configurations on one TV and use a clone file from this TV to configure all other TVs during the installation.
Use USB1 for cloning.
Ensure that the TV used to create the clone is configured for the same region as the TV(s) receiving the clone.
¶ Creating a clone file
This is how you create a clone file:
Insert a USB stick into USB1.
Enter the Professional Settings Menu.
Select Upgrade and Clone
Select Clone TV to USB
Clone All except Apps.
¶ Install TV using a clone file
This is how you install a TV using a clone file from a previously installed TV:
Insert a USB stick with the clone-file in USB1.
Power on the TV
Initial Installation Clone starts when the TV is powered up. Wait until it finishes.
Set Room ID to < Room Number >
Restart TV by powering it off and on.
Install TV using preferred method and follow instructions on TV
¶ Update TV-firmware from USB
The firmware is provided in form of a zip-file. The file must be unzipped, and the firmware-file is called TPM181HE_R.<version number>_autorun.upg.
¶ Updating firmware with UPG file
¶ Create a firmware update dongle
Create a folder named "upgrades" on the root of the USB-stick
Copy the firmware, "upg-file", to the "upgrades" folder.
¶ Updating the TV-firmware
After you have created a firmware update dongle, you can now update the firmware on the TV.
Power-On the TV
Insert the Firmware Update dongle in USB1 of the TV.
Enter the Philips Professional Settings Menu:
Press "319753-Mute" or "Mute-left-right-up-down-ok" on the remote in order to enter the professioanl settings.
Select Upgrades and Clone
Select firmware Upgrade from USB
Select the firmware to be upgraded
Confirm the upgrade.
Wait until upgrade is completed.
¶ Updating firmware with PKG file
¶ Create a firmware update dongle
Copy the pkg to the root of a USB drive and rename it to “upgrade_loader.pkg”.
¶ Updating the TV-firmware
Insert USB drive in the USB 2.0 port (black colored).
Remove the power cord
Insert the power cord
Wake up the TV
"Software upgrade in progress…" message will appear. It may take a couple of minutes before the message appears.
When the TV has booted up after the software upgrade, remove the USB drive.
It is recommended to rename the pkg or delete it to avoid accidental flashing of the pkg.
After flashing the PKG, reflash the clone.
¶ Troubleshooting
If the USB drive is not recognized by the TV, check the USB drive for errors and repair the USB drive if required.
If the USB drive is still not recognized by the TV after repairing the USB drive, please try again with another USB drive
¶ Update TV-firmware remotely from the management portal
¶ Prerequisites
- Access to a webserver
- UPG version of the Firmware is hosted on a web-server reachable by the TV's
¶ Upgrading
- Log on to the management portal and access the site with the TVs you want to upgrade.
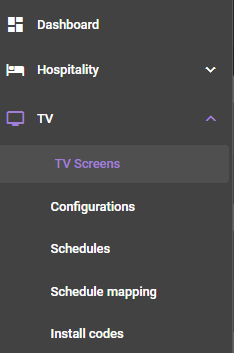
- Select the TV - TV Screens

- Right-click the TV you want to upgrade
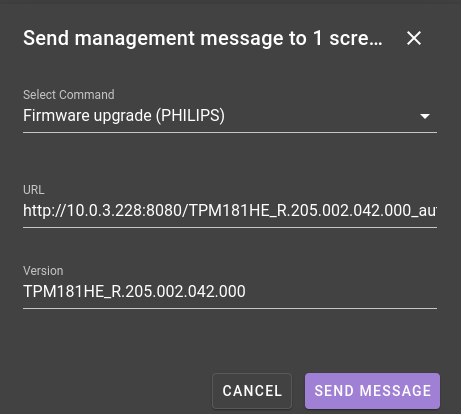
- Select Manage - Send Mgmt Message
- Select command: Firmwware upgrade(Philips)
- Fill in the fields with the following data.
- URL: URL to the firmware stored on the webserver. Complete url including filename.
- Version: Version of the firmware. The version should be in the name of the UPG file, minus the "_autorun.upg" at the end. It should look something like "TPM181HE_R.205.002.042.000".

- Send Message.
The FW will now be uploaded to the TV.
Only update 5-6 TVs at the same time, and wait 10 minutes before upgrading the next set of TVs.
This will minimize the traffic in the network.
¶ Installing Philips Soundbar HAL5023/00 with HFLxx14 - series TV
¶ Physical installation
- Connect the soundbar to TV via HDMI cable. Use an HDMI Arc input on the TV.
¶ TV settings
Enter the Philips Professional Settings Menu:
Press "319753-Mute" or "Mute-left-right-up-down-ok" on the remote in order to enter the Philips Professional Settings.
¶ Enable EasyLink
- TV Settings - Sound - Sound Management - TV Speakers - EasyLink Autostart
¶ Connect to the soundbar via Bluetooth
To connect to the soundbar via Bluetooth, an app called "BTSoundBar" needs to be opened. This can be opened just like any other native application.
The app is opened on the TV.
The actual Bluetooth connection is between the guest device and soundbar, but all information is displayed on the TV.