¶ Property Management Systems
A PMS system can be interfaced to automate the guest checkin/checkout process.
This document lists the PMS integration available in the system. Keep in mind that any PMS system can be used if you provide the integration using the available API.
¶ HotelKey, OHIP and RMS integrations
To be able to use the one of the HotelKey, OHIP or RMS PMS-integrations, ensure a valid license is activated on the site.
¶ Configuration
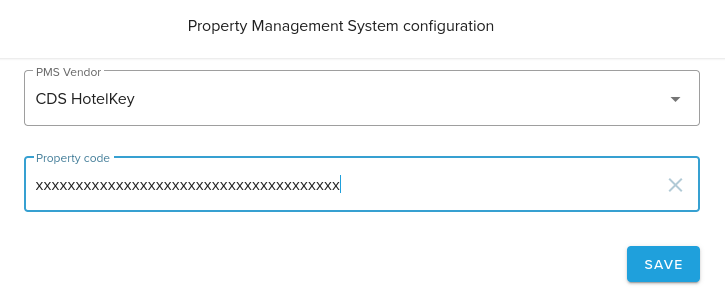
The screenshot shows an example how to configure the HotelKey PMS integration, but this configuration page is the same for both HotelKey, OHIP and RMS. You will need a property code for the integrations. Contact support on how to retrieve this code.
¶ Features
The following features are available in the HotelKey, OHIP and RMS integrations:
- Check-in
- Check-out
- Room move
¶ MEWS
The MEWS PMS system can be connected if the proper license is active.
¶ MEWS Configuration
After activating the license an access token must be obtained from MEWS to set up the connection. The screenshot shows how to configure this. The access token is used to authorize the hotel in the Mews integration.

¶ Features
The following features are available in the MEWS integration:
¶ Check-in
All guests for a reservation are checked in.
If the guests are already checked in the fields will be updated.
¶ Check-out
All guest in the room are checked out.
¶ View room bill
When the guest request to view the room bill, the Mews PMS is requested for all "Open Items" with status "Open" or "Closed" for the reservation.
¶ Refresh/synchronize all check-in and check-out data
Can be used in case of system errors/downtime to make sure everything is synchronized and no data is lost.
¶ TigerTMS
TigerTMS is used by 18,000 hotels worldwide and offers the possibility to connect to all leading PMS systems by using its iLink integration.
Note that the TigerTMS integration requires an active license from TigerTMS in addition to the PMS-integration license in the management portal
Data
All data to and from TigerTMS is sent using the SOAP protocol meaning that all messages are sent in XML format. Every message sent to TigerTMS includes the access token for authentication in addition to a unique sitename for identifying what context this message belongs to.
¶ On-premise vs Cloud installation
TigerTMS iLink can be installed both on-premise and as a cloud solution hosted by TigerTMS themselves. We always recommend going with the cloud based solution, if possible, because it's much easier to set up and maintain.
There are some caveats when running on-prem, please read further information below.
¶ On-premise
The TigerTMS iLink software will be installed on a server stored on the site/hotel. The network administrator(s) on the site might have to do some modifications on their firewall to allow communication between the TigerTMS server and the management server.
Requirements:
- Must allow incoming connections from our server (IP 13.48.12.1 port 443)
- Must allow outgoing connections to our server (ref URL below)
All requests from TigerTMS iLink -> Management portal will go to this endpoint:
https://api.thecloudportal.com/api/1/feature/pms/tiger/SendMessageToExternalInterface
Note: If the hotel does not require "View room bill" or "Express checkout" functionality, then incoming connections from the management portal is not required.
If you simply want to "mirror" data from the PMS to the management portal, then outgoing communication from the hotel to Hub is sufficient.
¶ Cloud
When TigerTMS iLink is installed in the cloud, all maintenance and setup is done by the TigerTMS team and the hotel won't need to do anything on their side.
All functionality will be supported out-of-the-box, including "View room bill" and "Express checkout".
¶ TigerTMS Configuration
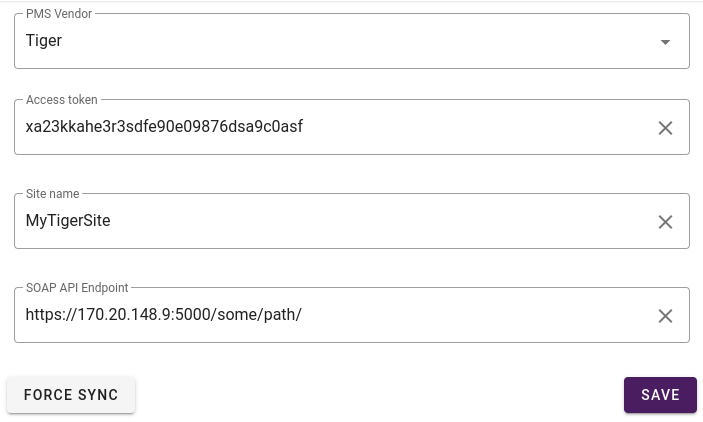
When setting up a TigerTMS iLink PMS connection, you need to set the following configuration settings which will be given to you from your TigerTMS technician.
- Access token / user key
The access token (or user key) is an authentication code for TigerTMS API and is required for outgoing communication from the management portal to TigerTMS.
- Site name
The site name is used for uniquely identifying a hotel and must match what TigerTMS has saved in their system. If there is a mismatch, then communication between the management portal and TigerTMS will fail and events such as check-ins will not be registered.
- SOAP API Endpoint
TigerTMS iLink uses a SOAP API so this field is for configuring what URL we will send SOAP commands to.
It will default to https://checkout.tigertms.com/GenericEXT/ if nothing else has been specified.
Example config:
Verifying PMS connectivity:
You can view a log for all the received/sent PMS messages on the "PMS Log" side.
Every 10th minute we will send a status request for "NonExistingRoom" to verify the link between the management portal and TigerTMS API. This will show as the following in the log:
Sent: SOAP msg type requestrefresh at URL <Tiger API URL>... Result: <Status>
A few seconds later this should follow:
Received: TigerMessageRefresh(resno=null, site=<Site Name>, room=NonExistingRoom, extensions=null, occupied=null, guestid=null, title=null, last=null, first=null, lang=null, group=null, vip=null, email=null, mobile=null, arrival=null, departure=null, cos=null, dnd=null, mw=null, tv=null, minibar=null, viewbill=null, expressco=null, wsuserkey=<Access Token>)
¶ Features
All features are available for all sites using the TigerTMS integration.
¶ Check-in
Supported parameters:
- Name
- Guest ID
- Language
- Arrival date
- Departure date
- Reservation number
If sending a new check-in request for a Guest ID which is already checked in, it will instead update the departure date for the existing booking.
¶ Check-out
Uses "Room Number" as unique identifier. Every guest in the given Room number will be checked out.
¶ View room bill
Uses "Room Number" as unique identifier.
¶ Refresh/synchronize all check-in and check-out data
Can be used in case of system errors/downtime to make sure everything is synchronized and no data is lost.
¶ Move Room for checked in customer
Uses old and new "Room Number" as unique identifiers. Every guest in the old room will be moved to the new room.
¶ Edit Guest
Uses "Guest ID" as unique identifier.
Supported parameters to update for guest:
- Reservation number
- Check-out date
- Name
- Language
¶ FIAS
Ensure a valid Hub PMS license is activated on the site to interface with a PMS that supports the standard FIAS protocol. Hub has been certified to work with the Oracle, Protel & Infor Products. Any PMS that supports the FIAS protocol can be integrated with Hub.
The FIAS integration requires an on premise hardware appliance installed running the agent software. Please refer to the documentation found here for further information.
¶ FIAS Configuration
Navigate to Administration -> PMS Configuration in the portal and do the following to use the FIAS PMS:
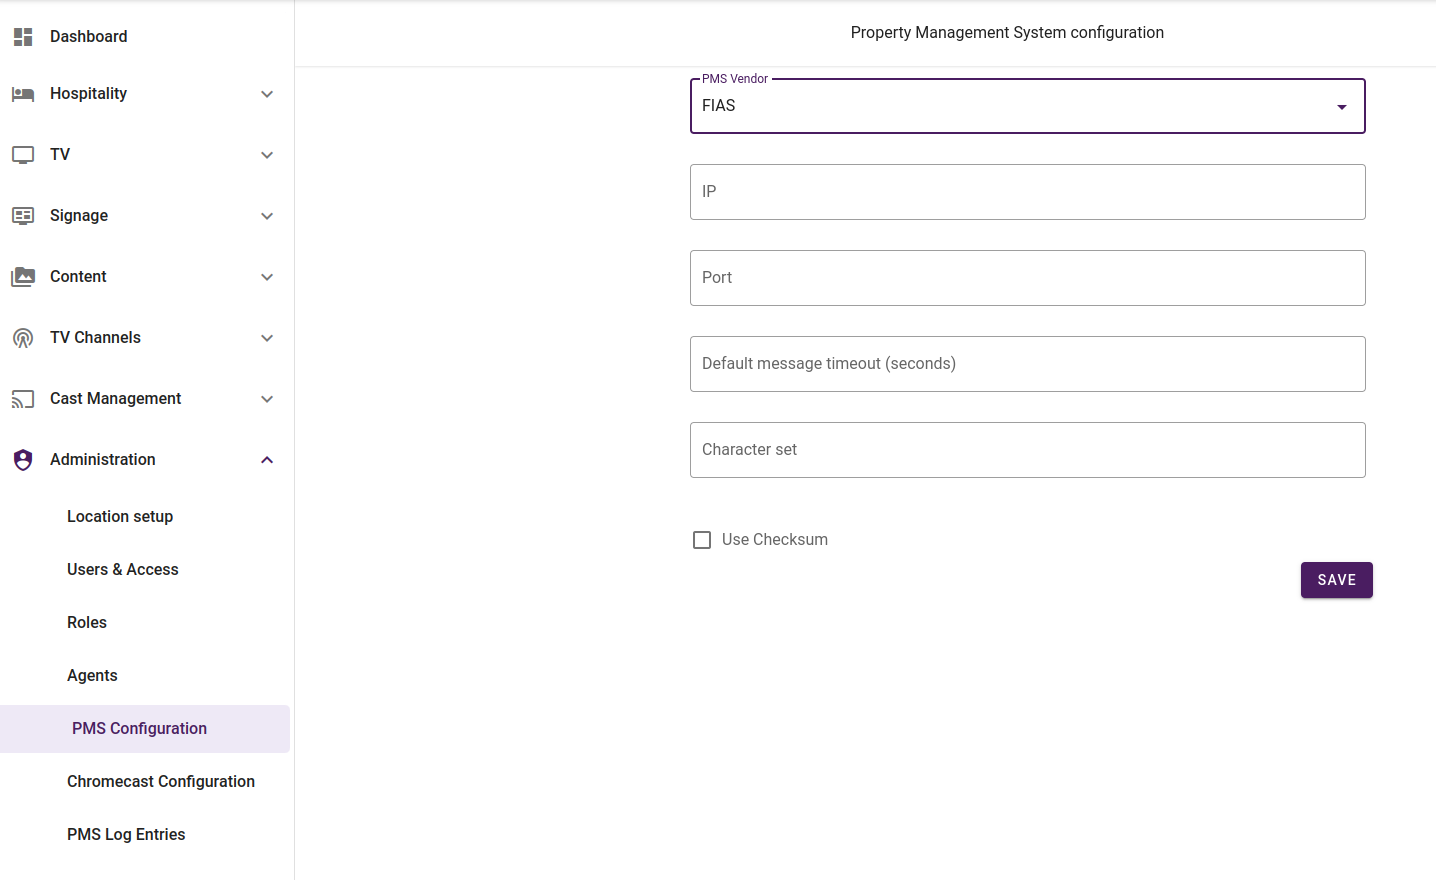
- PMS Vendor: Select FIAS as the PMS Vendor
- IP: the ip address where the FIAS PMS is located
- Port: the port where the FIAS PMS is located
- Default message timeout: The timeout for messages sent to the PMS, defaults to 30s if not set.
- Character set: Character set used for decoding incoming messages from the PMS, defaults to UTF-8 if not set.
- Checksum: Check this option if the FIAS PMS uses checksum calculation on each message
The IP and port configured must be reachable from the on-premise device. This device tries to connect to the FIAS PMS when the Save button is pressed. It will then set up the virtual connection to the cloud system.
Check the Agents page in the portal to see if the agent is online, and if the FIAS network proxy service is running on the agent.
¶ Features
Supported features for the FIAS integration:
- Check in
- Check out
- Update guest
- View bill
- Express checkout
- Wakeup
- Guest messages
¶ None
To use the None PMS, ensure a valid license is activated on the site.
¶ Daily check-in/check-out
To enable daily check-in/check-out, toggle the switch.
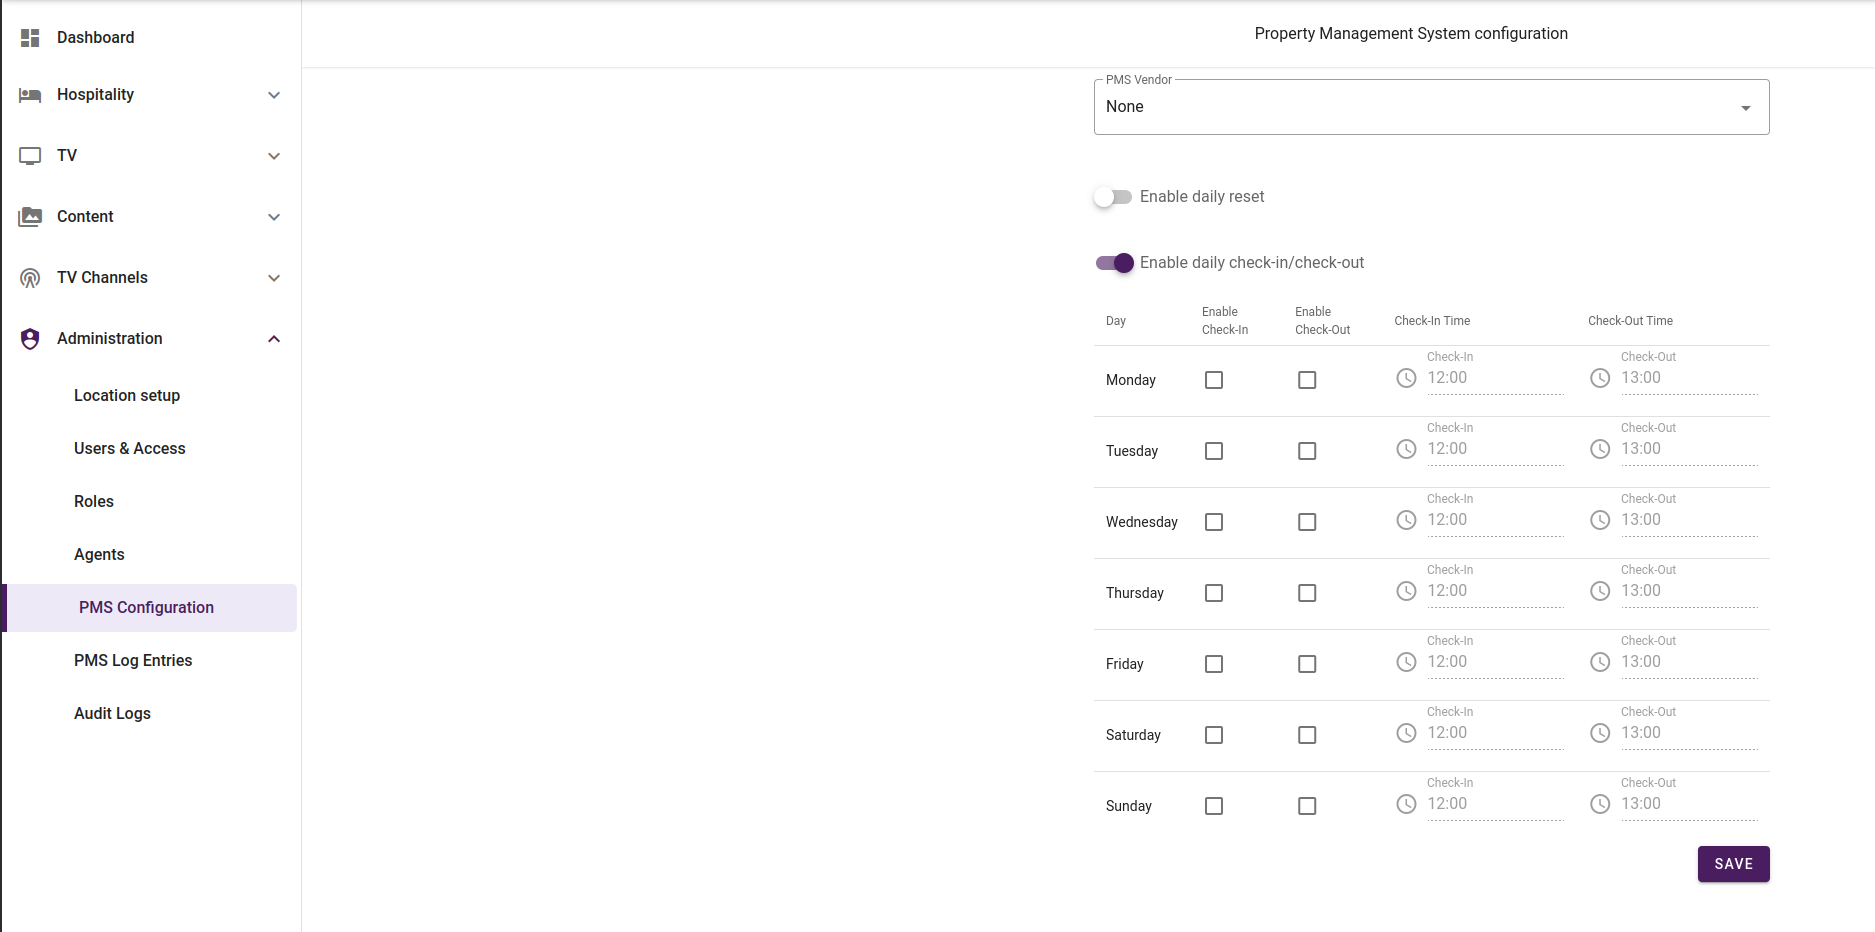
Here, you have the option to select weekdays, and when/if you want both check-in and check-out to occur. This will check-in/check-out all TV's on a site.
There is an enforced 30 minute gap between check-in and check-out to prevent any overlapping check-in/check-outs to occur & allow displays to reset.
Keep in mind that the TVs will turn on when checking in if the TVs are configured to display a welcome menu. On check-out the TVs will turn off.
¶ Others
¶ Chromecast Proxy
This integration will send a checkout message to various well-known casting proxy systems when a room is checked out. It is used to tear down all Chromecasts connections currently registered to a location.
On a site, navigate to the Hospitality Config screen and enable "Chromecast Checkout".
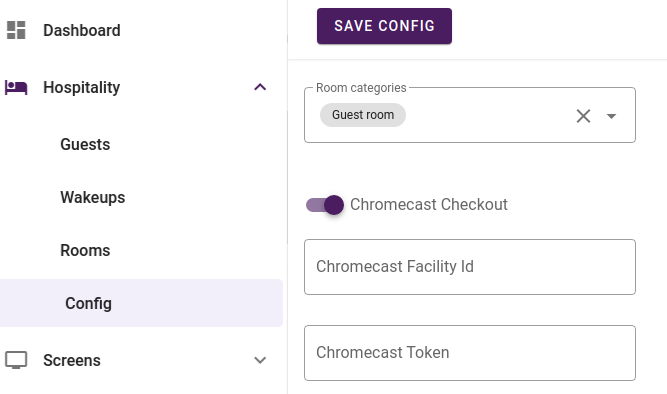
Parameters:
-
Chromecast Facility Id - The facility ID that identifying the cast-proxy system.
-
Chromecast token - Authorization token for the request. (Contact support for the token)
¶ Site Agent
¶ Software
Certain system functions requires access to resources on the local on-premise network where screens are installed. To enable this a local server running a custom linux image can be installed. This server will run a software called the agent which will connect to the cloud system and manage the local device.
Examples of functionallity that requires the on-premise device is the FIAS interface and the Cast solution.
NOTE: Only one agent can be used for each site.
¶ Installation
Download the latest ISO image.
Contact your assigned support personel for information on where to download the image from.
-
Burn the ISO image to any USB stick (Using the latest version of Rufus.)
-
Boot the server from the USB device
-
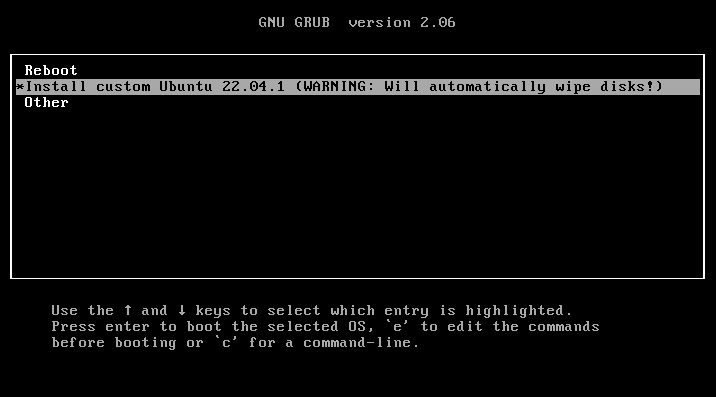
Choose "Install custom Ubuntu 22.04.1" and press enter.
-
Now wait for the ISO to install to the hard drive. This will take a couple of minutes. It will show "Start: and Finish:" frequently. This is normal. It will reboot automatically when finished.
-
When rebooted it will show "Ubuntu 22.04.1 LTS unconfigured tty1". Press enter and login with user: setup and password: setup
-
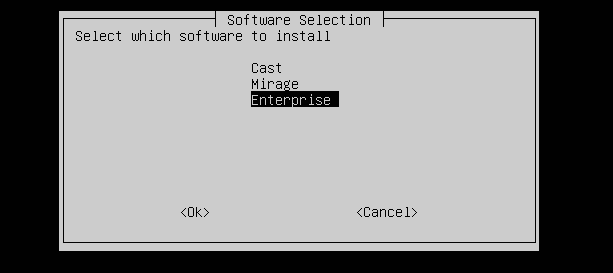
And after some seconds, the wizard appears:

-
Upon login after it has installed all necessary packages you should get a selection of software to install. Select "Mirage" if the site is not having a Chromecast solution. Select "Cast" if you have both PMS and Chromecast solution.
-
Fill in the language code for the country this installation is for. E.g. "no" for Norway.
-
Fill in the hotel name, all lowercase letters and use dash for space. E.g. "hotel-palace-building" for "Hotel Palace Building". When done it will ask for a hostname confirmation.
The data given in step 8 and 9 is for the hostname of the server.
-
Set the tech user password, please use a unique password for each installation and keep them safe. The password is personal and nobody can see it after it has been set.
-
Installer will now start installing the software needed and when done it will prompt you to login as tech user with the tech password. Setup user will now be disabled.
¶ Authentication
To authenticate you must login as a "tech" user, the software will be up and running connected to the cloud-portal system. Go into the "Mirage" menu when logging in and select "Status" and this window will pop up:
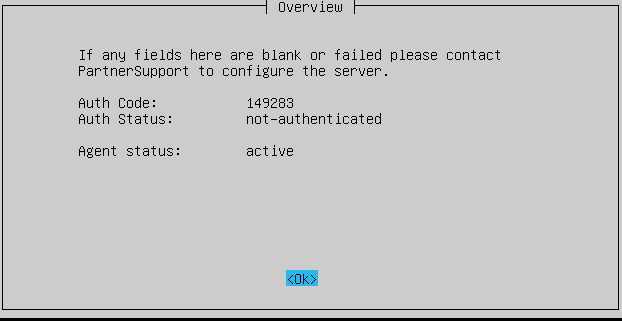
To install the agent to a site you login to the site portal and select: Administration -> Agents -> Add
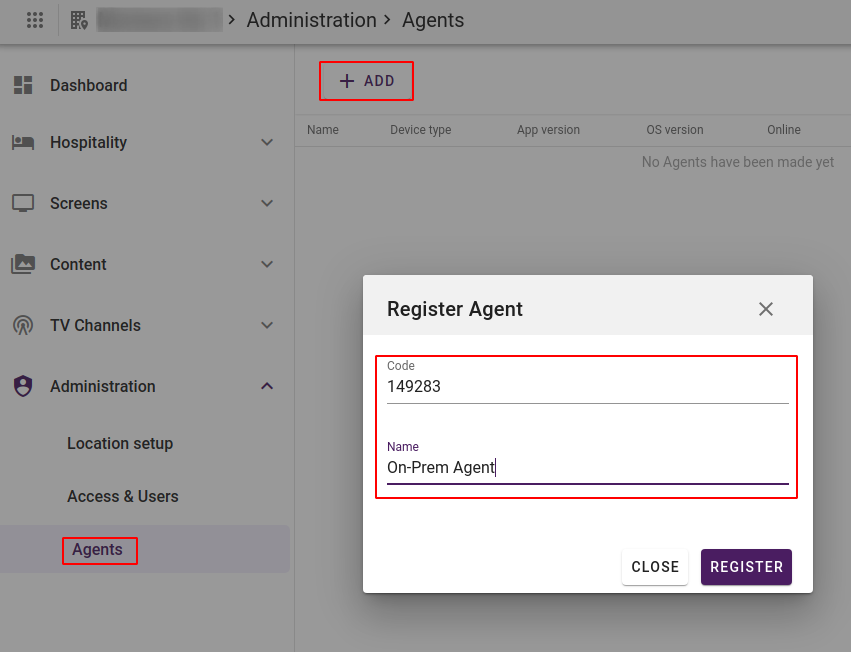
Fill in the details and press Register and the server should be configured and authenticated.
More functionality is currently under progress and will be announced later.
¶ Site Agent - Resource Server (HTTP Video Server & Sync)
¶ Prerequisites
Site Agent installed on site.
¶ Getting started
- License Activation: To begin, add the 'Site Agent - HTTP Video Server' license to a site.
- Installation: Upon license activation, the local agent will handle the installation process for the service automatically.
¶ Resource Management
- Automatic Downloads: Upon successful installation, Site Agent - Resource Sync begins downloading resources to the local storage.
- Updates & Additions: The system continuously monitors for new resources and downloads them as they are added.
¶ Configuration for Resource Server
After activating your license, a 'Configuration' sub-page appears under the 'Content' section.
- Access Configuration: Navigate to the 'Configuration' sub-page.
- Port Settings: The default port is '8770', but you have the option to modify this as needed. To check that the port is set correctly, click 'Check Configuration', if it's correct, it will say 'Configuration OK'.
- Internal URL Setup: By default, this is set to the local agent's ip address combined with the specified port.
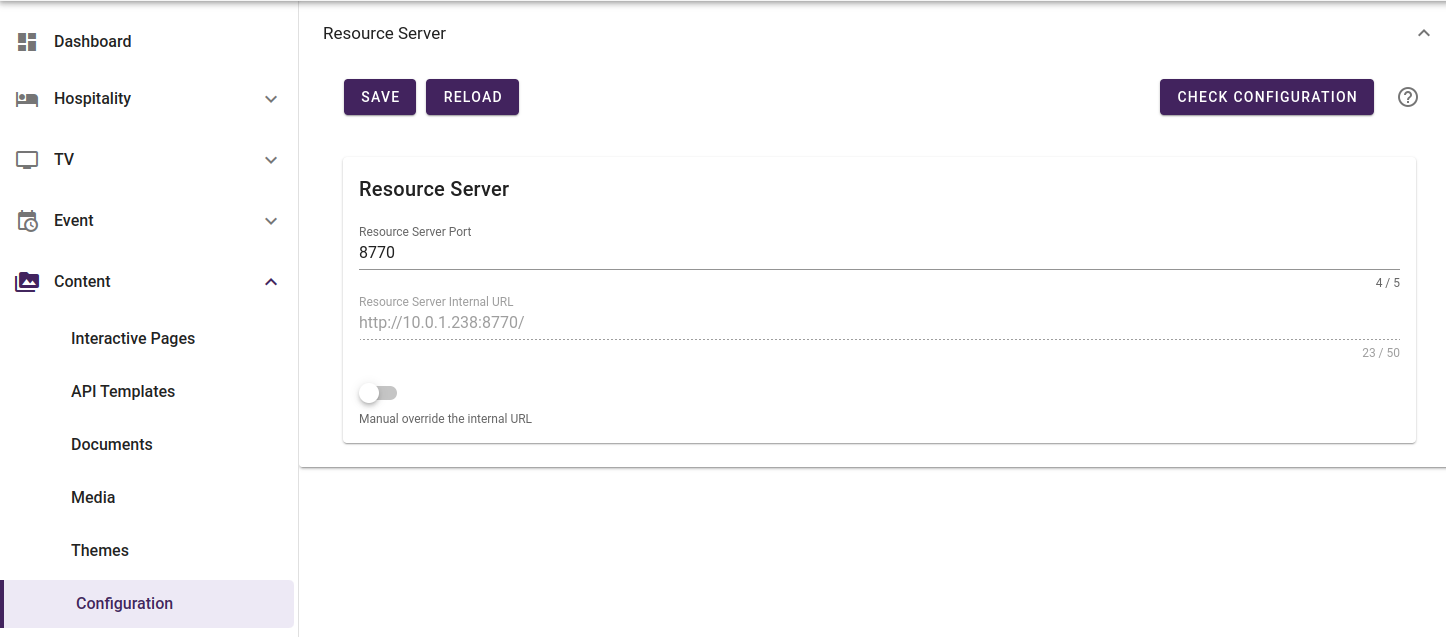
The port and internal URL is used by the TV's to use local resources.
Note: The port and internal URL settings are crucial for TVs to access local resources. Ensure these settings are accurate to prevent disruptions.
¶ Portal
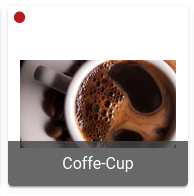
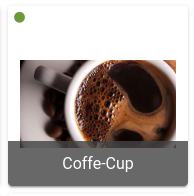
When 'Site Agent - HTTP Video Server' is licensed to a site, each media item (Content/Media) is visually assigned a sync-indicator to indicate whether it has been downloaded(synced) to local storage or not.
When a media item is not synced with the local hardware yet it displays a red sync-indicator
When a media item has been synced it displays a green sync-indicator
¶ Uploading and using local videos
Upload
To upload a video for the Resource Sync Service to sync and download, navigate to the site which the agent is installed. Navigate to Content, then the Media sub-menu.
Click the Upload Media button above the folders.
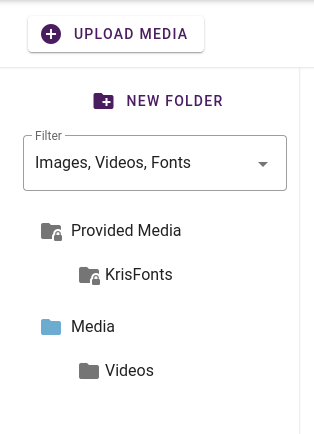
When the dialog appears, select the video to be uploaded.
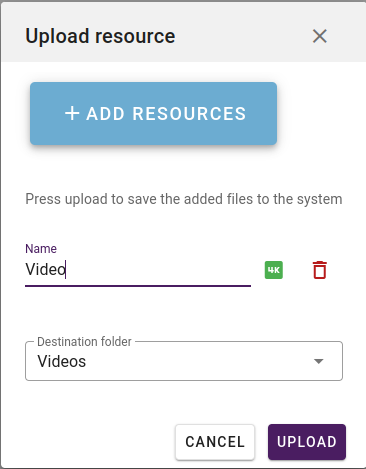
When the upload is complete, as mentioned in the Portal section above, the sync-indicator will appear on the video thumbnail, red color for not synced, and green for synced.
When green, the Resource Sync Service has successfully downloaded the video locally and set it's status to synced.
Usage
To use the local videos, in for example an TV Template, follow the instructions that can be found here (menu-elements), specifically the Video Player and TV Content sub-pages.
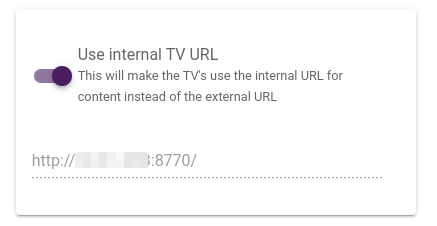
For the TVs to know to use local videos, a setting under Hospitality - Configuration needs to be enabled. Enable Use Internal TV URL for TVs to use internal URL when fetching local videos (requires reboot of TVs).
¶ Troubleshooting
Common Issues
- Incorrect Port/URL Settings: If resources are not accessible, first check your port and URL settings in the Resource Server configuration.
- TV not playing local video: If the TV is unable to play the video, here is a few things to check:
- Check the license is added.
- Check that the Hospitality Configuration has Use Internal TV URL enabled
- Check the network if the server is reachable from the TV
¶ Hardware
Hardware tested by us:
- OTR-10026 (To order send e-mail to: orders@uniguest.com)
- Dell PowerEdge R250 (i3)
- Intel NUC i3 gen 7, gen 8, gen 10 and gen 11
- MSI Pro DP21 11M
The server can be run virtually. The requirements are the same. The system integrator is responsible for the hypervisor and installation of the software. The virtual server must be installed with the same ISO file.
Minimum requirements:
| Usage | CPU | Memory | Disk |
|---|---|---|---|
| PMS | X86_64 2Ghz Quad Core | 4 GB | 50 GB |
| Cast Server | X86_64 2Ghz Quad Core | 8 GB | 50 GB |
| Resource Server* | X86_64 2Ghz Quad Core | 8 GB | 128 GB |
| PMS + Cast Server | X86_64 2Ghz Quad Core | 8 GB | 50 GB |
| PMS + Cast Server + Resource Server* | X86_64 2Ghz Quad Core | 8 GB | 128 GB |
*128GB covers all "normal" use cases for the Resource Server. In scenarios where the server is expected to store extraordinary large amounts of data the disk space requirement must be evaluated
The server needs to be equipped with minimum 1 network port and be supported by Ubuntu 22.04 LTS
NOTE: There can only be configured one Site Agent pr site.