¶ LG WebOS signage SoC installation
¶ WebOS 6.0+
This section covers displays running WebOS 6.0 version and up. It covers the following models:
- UL3J
- UH5J
- UH7J
- SM5J
- UM5K
- UM5N
- UH5N
- UH7N
- WP600
¶ Ethernet connection
Use the LAN port to connect the display to your network.
¶ How to do a factory reset
If the display has not been set up before, the display will power on in the ”Install menu”, shown below. The factory reset can then be skipped.
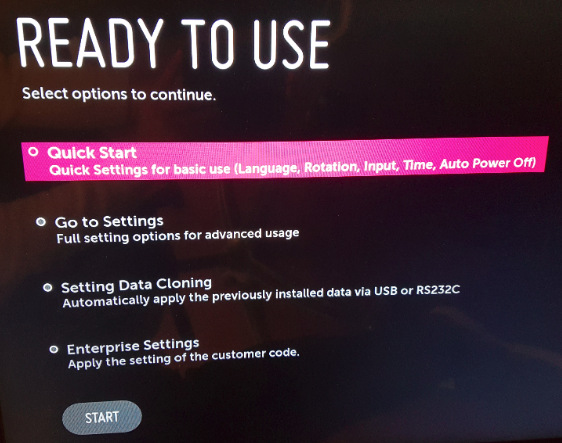
Power On your LG webOS display
- Press Settings on your remote control and select the Admin option.
- Enable the Admin menu, enter the pincode: “0-0-0-0-0-0” and press OK.
- Scroll down and select Factory Reset. Click OK.
- Click Confirm and the monitor will reset and power off.
- Do a normal installation of the screen
¶ Initial Installation
- Power On your LG webOS display
¶ Language and Location settings
- Select Language
- Select Region
- Select Country/Territory
- Select City
¶ Network Settings
- Set up your network accordingly
¶ User Agreements
- Agree
¶ Ready To Use
- Select Quick Start / Normal Configuration and click Next
- Set both Screen Rotation and External Input Rotation Off
- Set your HDMI accordingly
- Set your local Time & Date
- Select Done
¶ Mandatory Settings
- Press Settings on your remote control
- Select General
- Select Power
- Turn off No IR Power Off
- Turn off DPM (Standby Mode)
- Select EZ Settings
- Select SI Server Settings
- Turn on Fully Qualified Domain Name
- Type in the Digital Signage URL: https://digsig.tv/lg.zip
- Change Application Launch Mode to Local
- Select Local Application Upgrade and change to Remote
- Select Confirm
- Select OK
- Turn display off and on again
The application will start shortly after boot
¶ WP600 Only
- Press Settings on your remote control
- Select General
- Select Advanced Setting
- Select SIMPLINK Setup
- Turn OFF
¶ NICE TO KNOW
¶ Display software version
- Press Settings on your remote control
- Select General
- Select System Information
¶ Changing network type
- Press Settings on your remote control
- Select General and scroll down
- Select Network
- Wired
- Connect
- Wireless
- Select SSID
- Enter Password
- Wired
- Exit menu
¶ Changing Power settings
- Press Settings on your remote control
- Select General
- Select Power
- Turn off No Signal Power Off
- Turn off No IR Power Off
- Turn off DPM
- Exit menu
¶ Firmware update by USB
¶ Local CPU SW update
- Make a “LG_MONITOR” folder in USB device and copy the firmware to the folder.
- Insert the USB stick to USB1
- Power on display
- Software Update starts and you should confirm update by pressing OK
- The display will restart and show that current SW is the same as update version, press Menu/Home to exit
¶ Manually Launching S/W Update Menu
- Press the Settings button on the remote control.
- Click the General icon located in the left panel. The settings menu appears on the screen as shown below.
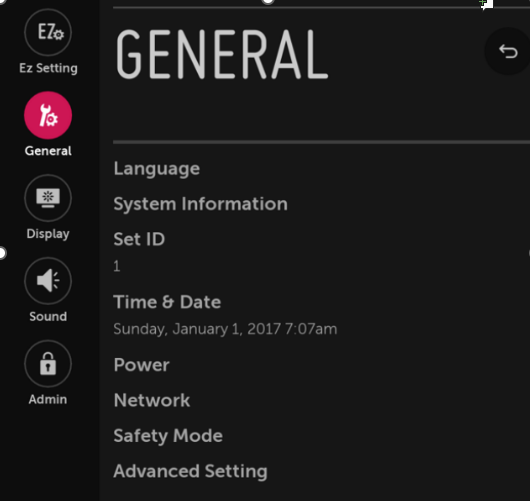
- Press the button 7-for seven times-on the remote control. Then the Software Update menu gets launched as shown below.
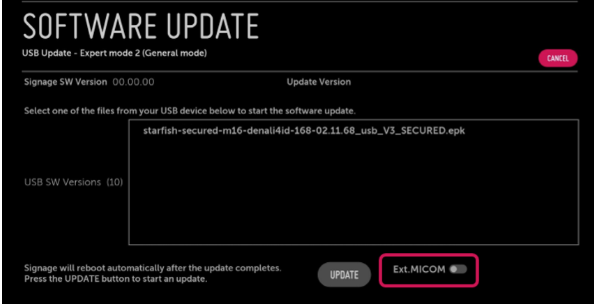
- Select the firmware file to update with.
- In case you are downgrading your firmware, i.e. updating with a version lower than the installed, enable the Ext. MICOM URSA* option (marked in red above).
- Click the UPDATE button to start updating with the selected firmware.
¶ WebOS 3.2, 4.x, 5.x
This section covers displays running WebOS 3.2 and up to(not including) 6.0. It covers the following models:
- SM5D
- SM5KD
- SM5KE
- SM3G
¶ Ethernet connection
Use the LAN port to connect the display to your network.
¶ How to do a factory reset
If the display has not been set up before, the display will power on in the ”Install menu”, shown below. The factory reset can then be skipped.
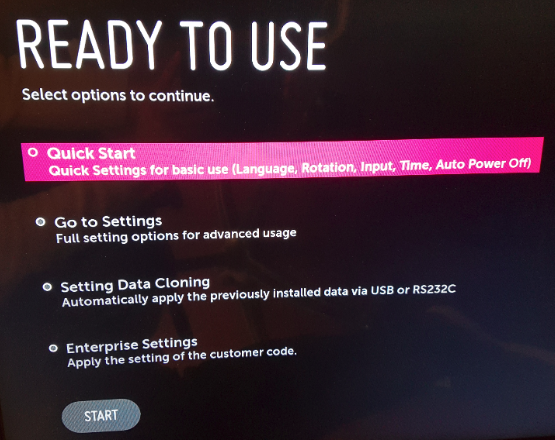
- Power On your LG webOS display
- Press Settings on your remote control and select the Admin option.
- Enable the Admin menu, enter the pincode: “0-0-0-0-0-0” and press OK.
- Scroll down and select Factory Reset. Click OK.
- Click Confirm and the monitor will reset and power off.
- Do a normal installation of the screen
¶ Initial installation
- Power On your LG webOS display
¶ Ready To Use
- Select Quick Start and click Start
- Select the Language in which to proceed
- Set Screen Rotation and External Input Rotation Off
- Set HDMI accordingly
- Set your local Time & Date
- Set No IR Power (4hour) Off
- Select Done
¶ Mandatory Settings
- Press Settings on your remote control
- Select EZ Setting
- Select SI Server Setting
- Turn on Fully Qualified Domain Name
- Type in the Digital Signage URL: https://digsig.tv/lg.zip
- Change Application Launch Mode to Local
- Select Local Application Upgrade and change to Remote
- Select Confirm
- Select OK
- Turn display off and on again
- The application will start shortly after boot
¶ Nice to know
¶ Display software version:
- Press Settings on your remote control
- Select General
- Select System Information
¶ Changing network type
- Press Settings on your remote control
- Select General and scroll down
- Select Network
- Wired
- Connect
- Wireless
- Select SSID
- Enter Password
- Wired
- Exit menu
¶ Changing Power settings
- Press Settings on your remote control
- Select General
- Select Power
- Turn off No Signal Power Off
- Turn off No IR Power Off
- Turn off DPM
- Exit menu
¶ Firmware update by USB
¶ Local CPU SW update
- Make a “LG_MONITOR” folder in USB device and copy the firmware to the folder.
- Insert the USB stick to USB1
- Power on display
- Software Update starts and you should confirm update by pressing OK
- The display will restart and show that current SW is the same as update version, press Menu/Home to exit
¶ Manually Launching S/W Update Menu
- Press the Settings button on the remote control.
- Click the General icon located in the left panel. The settings menu appears on the screen as shown below.
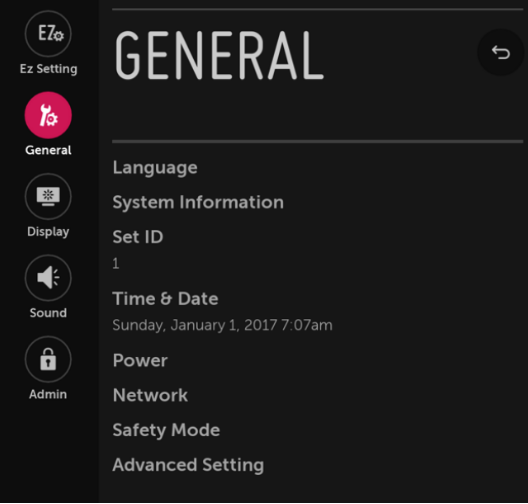
- Press the button 7-for seven times-on the remote control. Then the Software Update menu gets launched as shown below.
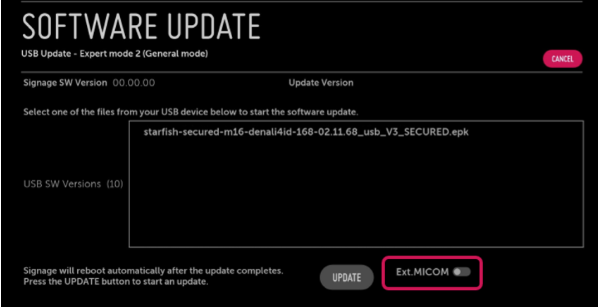
- Select the firmware file to update with.
- In case you are downgrading your firmware, i.e. updating with a version lower than the installed, enable the Ext. MICOM URSA* option (marked in red above).
- Click the UPDATE button to start updating with the selected firmware.
¶ WebOS 2.0, 3.0, 3.7
This section covers displays running WebOS 2.0, 3.0 and 3.7. It covers the following models:
- SM3B
- SM5B
- SM5KB
- SM5C
- SM5KC
- UH5C
¶ Ethernet connection
Use the LAN port to connect the TV to your network.
¶ How to do a factory reset
If the TV has not been set up before, the TV will power on in the ”Install menu”, shown below. The factory reset can then be skipped.
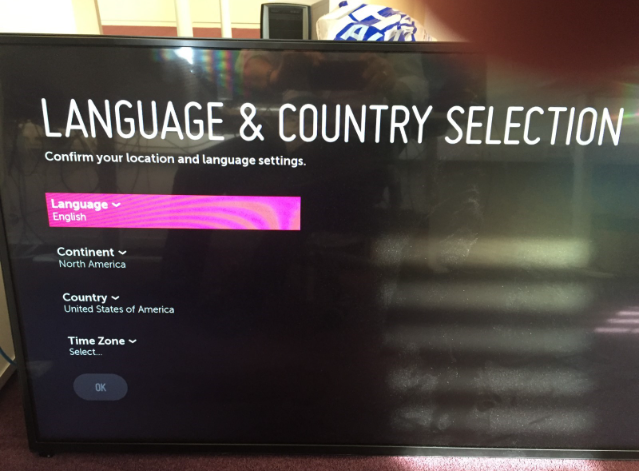
- TV has to be powered on
- Press and hold the Settings button on the LG remote for 5 seconds.
- When Toast (See picture, 3.3) is displayed, then press 0-0-0-0-OK”
- Select Signage setup – Factory Reset
- Do a normal installation of the screen
¶ Initial installation
- Power On TV
¶ Language & Country Selection
- Set Language
- Set Continent
- Set Region
- Set Country.
¶ Rotation
- OSD Portrait Mode Off
- Content Rotation Off
¶ Network Settings
- Set up your network accordingly
¶ On/Off Timer
- On/Off Timer Off
¶ Mandatory Settings
- Enter the Server menu
- Press and hold the Settings button on the LG remote for 5 seconds.
- When Toast (See picture, 3.3) is displayed, then press 8-0-8-0-OK”
- Application Launch Mode: Local
- Fully Qualified Domain name: On.
- Domain name: https://digsig.tv/lg.zip
- Local Application Upgrade: Remote
- Exit Server menu
- Press Settings button for settings menu
- Select Advanced - Network
- Select Network Type
- Wired - Connect.
- Wireless
- Select SSID
- Enter Password
- Return to main menu
- Enter General
- Select Timers
- Set AutoPowerOff: OFF.
- Exit the menu
- Enter the Signage Setup menu
- Press and hold the Settings button on the LG remote for 5 seconds.
- When Toast (See picture, 3.3) is displayed, then press 0-0-0-0-OK”
- Go to Power Off Management
- Set DPM: Off.
- Exit the Signage Setup menu
- Power Off Screen and Power it on again
- Application starts.
¶ Nice to know
¶ TV software version:
- Press Smart/Home button on LG remote.
- Select Information
¶ Changing network type
- Select Settings – Advanced - Network
- Select Network Type
- Wired
- Connect
- Wireless
- Select SSID
- Enter Password
- Exit menu
- Wired
¶ Accessing Installation Menu
- Press and hold the SETTINGS button for 5 seconds.
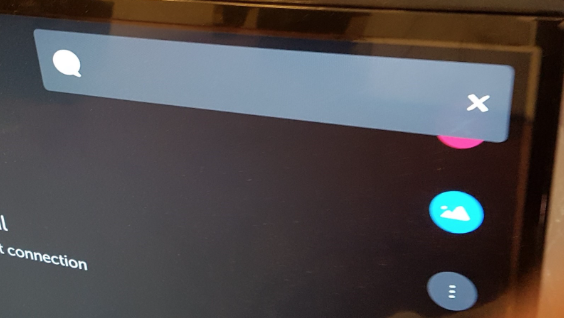
- When Toast (The top right corner) is displayed, then press 0-0-0-0-OK
¶ Firmware update by USB
¶ Local CPU SW update
- Make a “LG_MONITOR” folder in USB device and copy the firmware to the folder.
- Insert the USB stick to USB1
- Power on TV
- TV Software Update starts and you should confirm update by pressing OK
- The TV will restart and show that current SW is the same as update version, press Menu/Home to exit
¶ Manually Launching S/W Update Menu
- Press the Settings button on the signage remote control. The icon menu appears on the right of the screen
- Press the All Settings icon on the screen. The settings menu appears on the screen as shown below.
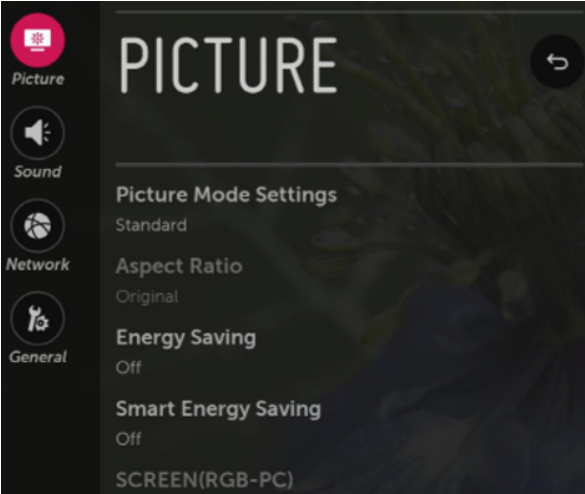
- Click the General icon located in the left panel.
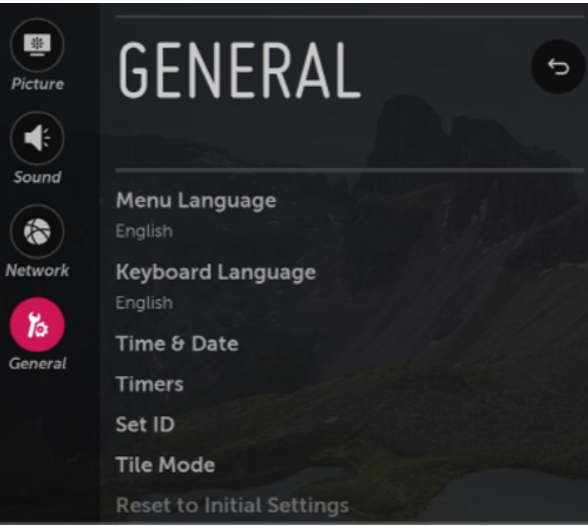
- Press the button 7-for seven times-on the remote control. Then the Software Update menu gets launched as shown below.
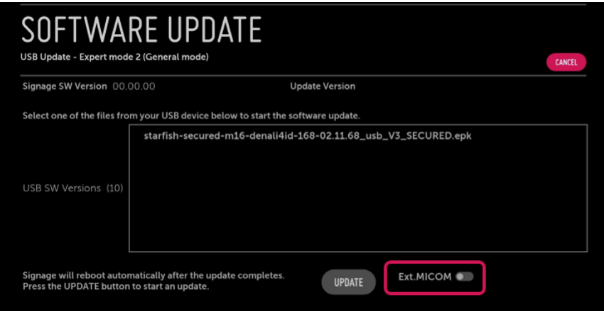
- Select the firmware file to update with.
- In case you are downgrading your firmware, i.e. updating with a version lower than the installed, enable the Ext. MICOM URSA* option (marked in red above).
- Click the UPDATE button to start updating with the selected firmware.