¶ Philips Android signage SoC installation
There are special sections relating to the following screens:
The general section covers any supported screen except those listed above.
¶ Downloading the latest APK
¶ Option 1: Using a USB-stick
- Make sure the USB-stick is formatted as FAT32. Other formats such as NTFS may not be recognized by the screen.
- Download the latest APK file from https://downloads.digsig.tv on your computer.
- Copy the file to a USB-stick.
- Plug the USB-stick into the screen.
¶ Option 2: Using the browser
- Open the web browser and go to https://downloads.digsig.tv.
- Click the Philips/ProDVX link.
¶ Installing the APK
¶ Option 1: Using a USB-stick
- Go to the section relating to the desired screen to see installation method.
¶ Option 2: Using the browser
- Press Open in the popup that appears after downloading.
.jpeg)
- Press INSTALL/UPDATE.
- Press OPEN to open the application.
¶ Upgrading the android application
You do not need to uninstall the old version first. Installing the new APK will update the existing application.
- Download the latest APK
- USB-stick
- Find your screens section on this page and follow the "USB-stick" instructions.
- Browser
- After downloading the file, follow the Installing the APK browser section.
¶ General Philips Android
¶ Ethernet
Use the LAN port to connect the display to your network.
¶ WiFi
- Enter the Configuration menu.
<Home-1-8-8-8> - Select Settings.
- Select WiFi settings
- Select SSID
- Enter the password
- Connect to the SSID.
¶ How to do a factory reset
- Display must be powered on
- Enter the Configuration menu.
<Home-1-8-8-8> - Select Settings
- Select System Tools – Factory Reset
- Do a normal installation of the screen
¶ Initial installation
- Power On display
- Welcome -> Select Language -> Start
- Network Setting - Select network connection (BDL3050Q only Ethernet available)
- Ethernet
- Connect the Ethernet cable.
- Wifi
- Select Wifi and press Next
- Enter the password
- Connect to the network
- Skip loading configurations from USB or SD.
- Select Finish
- Ethernet
- BDL3050Q – Main Switch – Enable
- BDL4050D Network Setting - Select DHCP
- Signage Display Settings - Skip
- Clone media files into internal – Skip
- Setup Complete - Finish
- Enter the Configuration Menu
<Home-1-8-8-8> - Download the latest APK
- USB-stick
- Select Apps
- Select File Manager
- Select to open mnt/usb_storage/
- Select the apk file you downloaded earlier
- Select install
- Browser
- After downloading the file, open the file to install
- USB-stick
- After installation, select done and go back to the Configuration Menu.
- Select Settings
- Select Signage Display
- Select Custom App
- Select Select App
- Select the APK signage app and save
- Go back to Settings
- Select Date & Time and Select time zone. Select your time zone in the list
- Exit the menu (Click return on remote until you are out)
- The install code is now showing. Follow the next section to complete the installation.
- BDL3050 After exiting the menu, press source button and select Custom as source. The install code will then be shown.
¶ General settings
Power settings
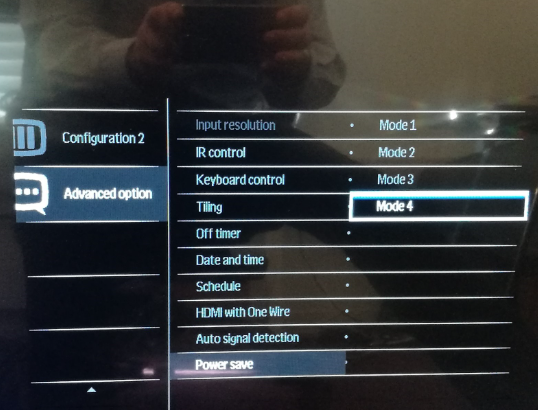
Select Home -> Advanced option -> Power save -> Mode 4

Remove logo
Select Home -> Configuration 2 -> Logo -> Off

¶ Nice to know
¶ Display software version
- Enter the Configuration menu.
<Home-1-8-8-8> - Select Settings
- Select About – Build Number
¶ Changing network type
- Enter the Configuration menu.
<Home-1-8-8-8> - Select - Network
- Select Network Type
- Wired
- Connect
- Wireless
- Select SSID
- Enter Password
- Wired
- Exit menu
¶ BDL5051T & BDL3351T
¶ How to do a factory reset
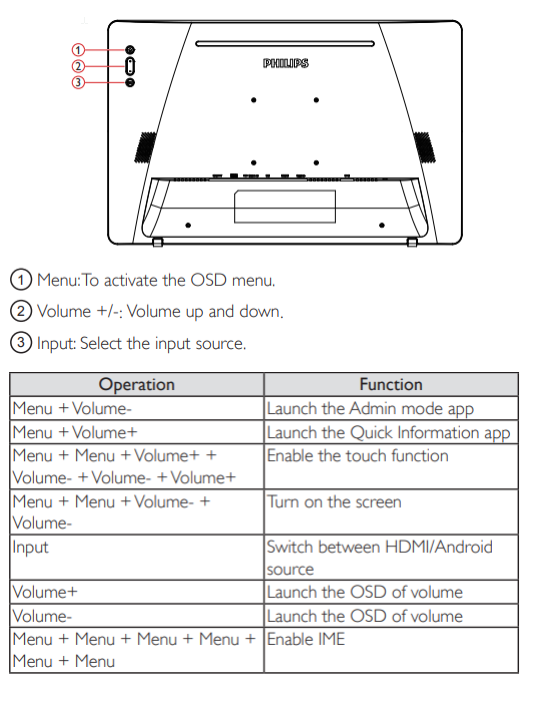
- Enter Admin mode by pressing Menu and Volume -
- Enter default password “1234”
- Choose “settings” -> Signage Display -> System tools -> Factory Reset
- Press Factory Reset again and press OK
¶ Initial installation
- Power On display
- Select “Date & Time” and “Select Time Zone” for your time zone.
- Clone Media Files into Internal: Skip
- Signage Display settings: Skip
- Security Setting: Skip
- Network Settings: Choose Wi-Fi or Ethernet
- Wi-Fi: connect to your Wi-Fi network and continue
- Ethernet: Enable Ethernet to continue (recommended)
- Setup Complete: Finish
¶ Screen booted
You may get a message saying: Please enable "Unknown sources" installation first. To get around this, go back to the Configuration Menu -> Security and enable Unknown sources.
- Download the latest APK
- USB-stick
- Enter Admin mode again by pressing Menu and Volume-
- Enter default password “1234”
- Select “Storage” and choose the USB stick with the APK file
- Select the APK file
- Select “Open”
- Select “Install”
- Browser
- After downloading the file, open the file to install
- USB-stick
- After installation, select done and go back to the Configuration Menu
- Select “Settings”
- Select “Signage Display”
- Select “General Settings” -> Boot on source -> Input -> Custom App
- Go back to “General Settings” and select “Boot Logo” -> ”OFF”
- Go back to “Signage Display”
- Select “Source Settings” -> Custom App -> Select App -> Select the signage APK app -> Save
- Go back to “Settings”
- Select "Display" and siable "Auto-rate screen"
- Exit the menu
Now you should see the install code on screen.
¶ BDL4550D & BDL3551Q
¶ Ethernet
Use the LAN port to connect the display to your network.
¶ How to do a factory reset
If the display has not been set up before, the TV will power on in the” Install menu”, shown below. The factory reset can then be skipped.
- On the remote: Press the home button and when a menu shows press 1-8-8-8 to enter Android menu
- Enter Settings – Signage Display – System Tools – Factory Reset – select Factory reset and then OK.
- The screen will now reset to factory settings.
¶ Initial installation
- Power On display
- Welcome -> Select Language -> Start
- Security Setting: Skip
- Signage Display Settings: select Manual Setup and Next
- Signage Display Name: Skip
- Remote Control: Skip
- Network Settings:
- BDL4550D: Choose Wi-Fi or Ethernet
- Wi-Fi: connect to your Wi-Fi network and continue
- Ethernet: Enable Ethernet to continue
- BDL3550Q: See that Ethernet is selected and press next
- Ethernet: Enable Ethernet to continue
- BDL4550D: Choose Wi-Fi or Ethernet
- Clone Media Files into Internal: Skip
- Setup Complete: Finish
Now you get some questions about access:
- Allow CMND&Deploy to access photos, media, and files on your device? Allow
- CMND & Deploy: I Accept and Continue
- Now a message saying updates are available. Select LATER since this is just for updating Teamviewer app which we do not use.
- Press the Home button on the remote to open built in settings
- Advanced Option – Date and time: Choose time zone and check that the time and date is correct. If not, turn off Auto Sync and set time and date manually.
- Exit the menu.
- Press the home button and when a menu shows press 1-8-8-8 to enter Android menu
- Follow the General Settings described below
¶ General settings
¶ To install Signage APP:
You may get a message saying: FILE MANAGER: for your security, your TV is not allowed to install unknown apps from this source. Select settings – and select Allow from this source.
-
- USB-stick
- From the Android Menu select Storage - USB
- Find the APK downloaded to install the Signage app.
- Select install. When installation is finished, select OPEN to start the Android Signage app.
- After installation is completed, unplug the USB stick.
- From the Android Menu select Storage - USB
- Browser
- After downloading the file, open the file to install
- USB-stick
-
The signage app should now open and display the install code
¶ Nice to know
¶ Software version
- Use the Philips controller and press the home button and when a menu shows press 1-8-8-8 to enter Android menu
- Select Settings – System - About
To check for newer versions: Settings – System Update – see that Online Update is activated. It will then check automatically when booting the screen.
¶ 24BDL4151T
¶ How to do a factory reset
- Enter Admin mode by pressing Menu and Volume -
- Enter default password “1234”
- Choose “settings” -> Signage Display -> System tools -> Factory Reset
- Press Factory Reset again and press OK
The system will boot back up to factory default.
¶ Initial installation
Welcome Screen: Select Language and press Start
Signage Display Settings: Press “Skip”
Network Type: Ethernet/WiFi
- Ethernet: Connect your ethernet cable into the screen.
- WiFi:
- Select WiFi
- Press Next
- Select SSID
- Enter Password
- Connect to Network
- Skip loading configurations from USB to SD
- Select finish
Screen Booted
- Download the latest APK
- USB-stick
- Enter Admin mode again by pressing Menu and Volume-
- Enter default password “1234”
- Select “Storage” and choose the USB stick with the APK file
- Select the APK file
- Select “Open”
- Select “Install”
- Enter Admin mode again by pressing Menu and Volume-
- Browser
- After downloading the file, open the file to install
- USB-stick
- After installation, select done and go back to the Configuration Menu
- Select “Settings”
- Select “Signage Display”
- Select “General Settings” -> Boot on source -> Input -> Custom App
- Go back to “General Settings” and select “Boot Logo” -> ”OFF”
- Go back to “Signage Display”
- Select “Source Settings” -> Custom App -> Select App -> Select the signage APK app -> Save
- Go back to “Settings”
- Select “Display” -> ”When device is rotated” -> “Stay in current orientation”
- Go back to “Settings”
- Select “Date & Time” and “Select Time Zone” for your time zone.
- Exit the menu
Now you should see the install code on screen.

¶ 10BDL4551T
¶ Ethernet
Use the LAN port to connect the display to your network.
¶ How to do a factory reset
If the display has not been set up before, the TV will power on in the” Install menu”, shown below. The factory reset can then be skipped.
- Enter the Android menu. “Stop key, then Volume down key. Pincode 1-2-3-4
- Enter Settings – Signage Display – System Tools – Factory Reset – select Factory reset and then OK.
- The screen will now reset to factory settings.
¶ Initial installation
- Power On display
- Welcome: Select language and select Start
- Security Setting: Skip
- Signage Display Settings: select Manual Setup and Next
- Signage Display Name: Skip
- Remote Control: Skip
- Network Settings:
- Choose Wi-Fi or Ethernet
- Wi-Fi: connect to your Wi-Fi network and continue
- Ethernet: Enable Ethernet to continue
- Choose Wi-Fi or Ethernet
- Clone Media Files into Internal: Skip
- Setup Complete: Finish
When CMND & Deploy shows:
- Enter the Android menu. “Stop key, then Volume down key. Pincode 1-2-3-4
- Follow the General Settings described below
¶ General settings
To install Signage APP:
You may get a message saying: FILE MANAGER: for your security, your TV is not allowed to install unknown apps from this source.
- Download the latest APK
- USB-stick
- From the Android Menu select Storage - USB
- Find the APK downloaded to install the Signage app.
- Select install. When installation is finished, select OPEN to start the Android Signage app.
- Browser
- After downloading the file, open the file to install
- USB-stick
- Select settings – and select Allow from this source.
- Press the back button on the remote to continue installation
The signage app should now open and display the install code
After installation is completed, unplug the USB stick.
¶ Nice to know
¶ Get software version
- Enter the Android menu. “Stop key, then Volume down key. Pincode 1-2-3-4
- Select Settings and open About – Device Info.
¶ 10BDL3051T
¶ How to do a factory reset
- Display has to be powered on
- Enter the Configuration menu. Stop key, then Volume down key.
- Pincode
<1111> - Select Settings
- Select System Tools -> Factory Reset
Continue to do a normal installation of the screen
¶ Initial installation
-
Power On display
-
Select Language.
-
Select network connection
- Ethernet
- Connect the Ethernet cable.
- Wifi
- Select Wifi and press Next
- Select SSID
- Enter the password
- Connect to the network
- Skip Signage Display settings.
- Skip loading configurations from USB or SD.
- Select Finish
- Ethernet
-
Enter the Configuration Menu. “Stop key, then Volume down key.
-
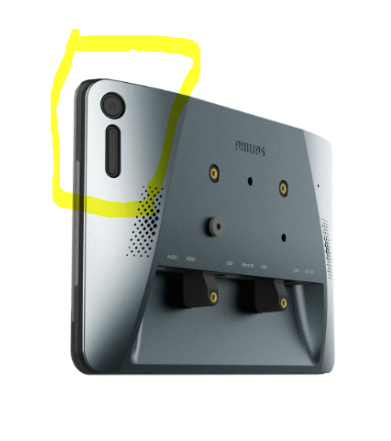
Stop and volume keys are located on the back side of the screen:

-
Enter pincode. Default pin is: 1234.
-
Select Settings
-
Select Signage Display
-
Select “Change Administrator Password”
-
Enter old pin code.
<1234> -
Enter new pincode
<1111> -
Exit to Configuration Menu.
-
- USB-stick
- Select Apps
- Select File Manager
- Open mnt/ -> usb_storage -> USB_DISK1
- Open the APK-file
- Select install
- Browser
- After downloading the file, open the file to install
- USB-stick
-
After installation, select done and go back to the Configuration Menu.
-
Select Settings
-
Select Signage Display
-
Select Custom app
-
Click Select App, choose the signage APK and save
-
Return to Signage Display
-
Select “Boot on source”
-
Select Input
-
Select “Custom app”
-
Select Date & Time and Select time zone.
-
Exit the menu
The install code should now be showing. Follow the below to complete the installation.
¶ Network
¶ Ethernet
Use the LAN port to connect the TV to your network.
¶ WiFi
- Enter the Configuration menu. Stop key, then Volume down key
- Pincode
<1111> - Select Settings.
- Select WiFi settings
- Select SSID
- Enter the password
- Connect to the SSID.
¶ Nice to know
¶ Get software version
- Enter the Configuration menu. Stop key, then Volume down key
- Select Settings
- Select About -> Build Number
¶ Changing network type
- Enter the Configuration menu. Stop key, then Volume down key
- Select - Network
- Select Network Type
- Wired
- Connect
- Wireless
- Select SSID
- Enter Password
- Wired
- Exit menu