Most functions in the system can be manipulated via the public API. This includes functions related to distributors and resellers, guest-related functions and pure screen-related management functions.
Certain parts of the API are limited by license while others are available to anyone that are allowed to set up API access accounts.
¶ Access Tokens
An Access Token is required to make any API request. These tokens are generated when making an API Account in the system. The tokens should be considered to be confidential information and the data should be treated as such. You will only be able to retrieve the token from the system at API account activation. If you lose the token or disable the account, a new token can be generated by re-activating the account.
API Accounts can be created at all levels; Distributor, Reseller and Site.
The API for the Distributor and Reseller levels is not yet released.
¶ Site-level Access Tokens
Once logged in to a site, you can create an API Account under "Administration" -> "Users & Access". Simply click the "ADD API ACCOUNT" button.

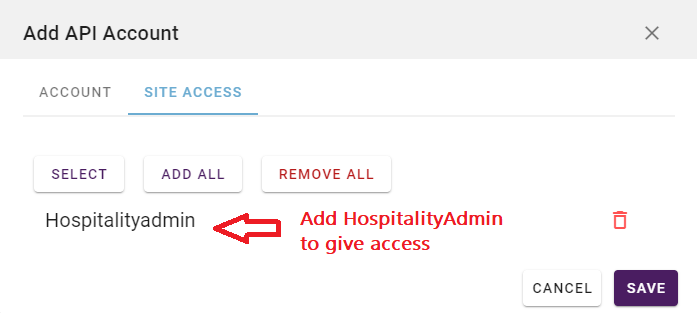
Name the account, then move on to the "SITE ACCESS" tab and add the Hospitalityadmin access level.
Now click save.
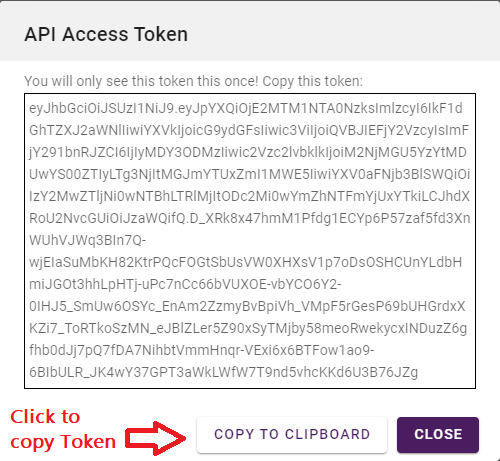
You will now see a window displaying the access token for the account. You will have to copy this token.
Remember, you will only be able to retrieve this token at this stage. Once this window is closed >you cannot recover the token. Save it and treat it as confidential information.
¶ Documentation
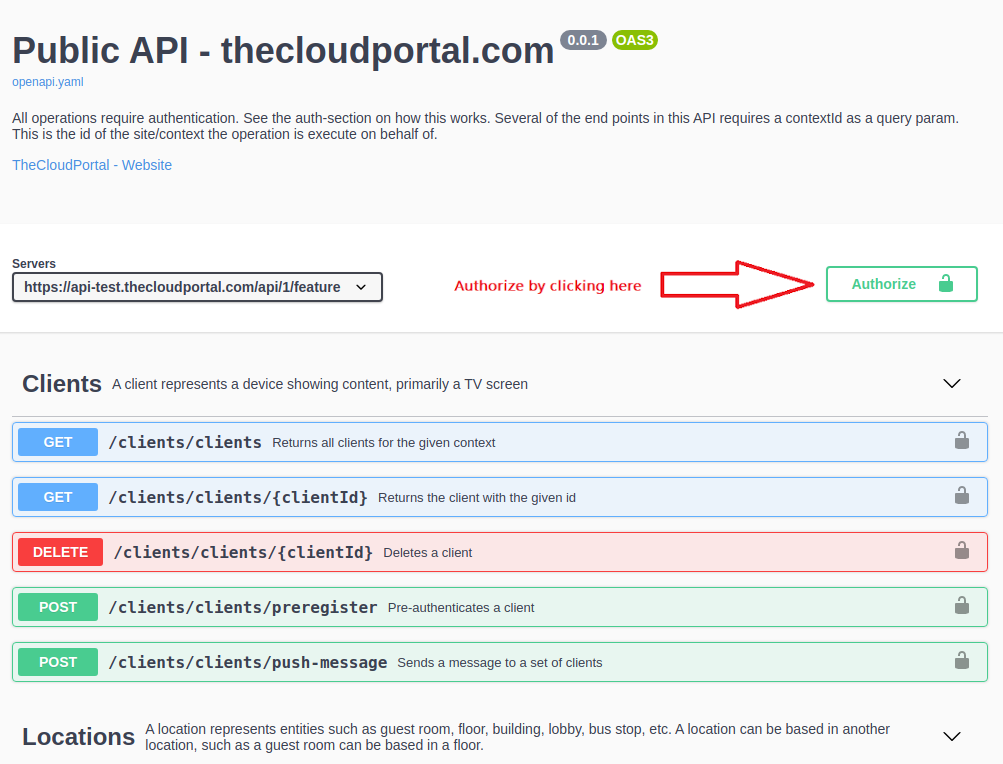
The API is documented at https://apidoc.thecloudportal.com/
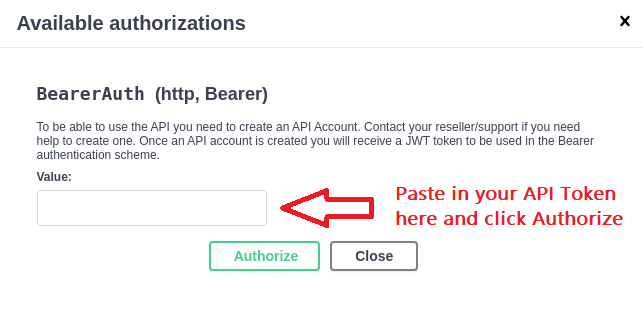
This page also offers the option to run live tests of the API. To test the API-functions, you will have to register the Access Token by clicking the "Authorize" button at the top right as shown below
¶ Hospitality
All hospitality-related functions such as adding rooms and checking in guests can be done through our public API.
Below are some examples for check-in and check-out to get you started. Remember that you need to generate an access token first by creating an API account with HospitalityAdmin permissions on the context (site).
¶ Check-in
Before we can do a check-in, we need to get the correct locationId corresponding with the room the guest is checking in to. To do this, we send a GET request to our location endpoint to fetch all locations (rooms) and then save the id for the specific room.
GET https://api.thecloudportal.com/api/1/feature/context-locations/locations?contextId={{contextId}}
Swap {{contextId}} with the id belonging to your site. If you're not sure what your contextId is, you can find out by going to Administration -> Access & Users -> click on an API account and read contextId in the dialog box (see example below).
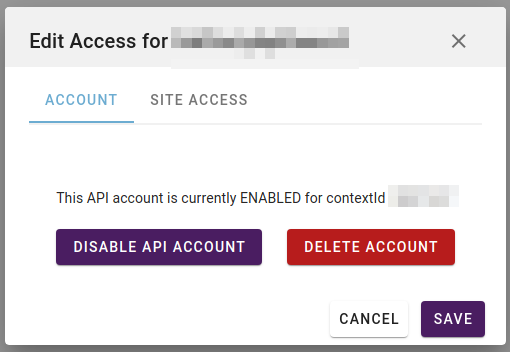
The locations endpoint will return a list of all rooms, example below:
[{
    "id": "31920838",
    "contextId": "321873",
    "ref": "101",
    "categoryId": "5343241",
    "locations": "",
    "tags": "",
    "title": {
      "en": "Room 101",
    }
}]
Once we have our room id we can go ahead and check in our guest at this endpoint:
POST https://api.thecloudportal.com/api/1/feature/hospitality/guest-accounts
The body payload must contain a JSON object containing a GuestAccount, example below:
{
    "contextId": "321873",
    "name": "John Doe",
    "accountReference": "ExternalSystemReference",
    "checkInDate": "2022-02-14T17:05:43.961Z",
    "checkOutDate": "2022-02-15T12:00:00.000Z",
    "roomAccountId": "",
    "locationId": "31920838",
    "language": "en"
}
API will return HTTP code 200 and a copy of the GuestAccount object if the request was successful. Also note that this object will contain an id, which is an unique ID we can use later when modifying the booking or if we want to check-out the guest. If the check-in request was unsuccessful, you will receive an appropriate error message (for instance 401 Unauthorized or 403 Invalid data).
¶ Check-out
When we want to check-out a guest we first need to find the guestAccountId. You will already have received this after checking in a guest (returned as id when checking in a guest), but you can also use the same endpoint as check-in with a GET request to list all current guests.
GET https://api.thecloudportal.com/api/1/feature/hospitality/guest-accounts?contextId={{contextId}}
Once you have found the correct guestAccountId you can send a DELETE request to the same endpoint to check-out the guest - as long as you append the guestAccountId to the URL.
DELETE https://api.thecloudportal.com/api/1/feature/hospitality/guest-accounts/{{id}}
Change {{id}} with the appropiate ID either from the check in POST request or from the GET request to "guest-accounts".
¶ Move a screen from one schedule mapping to another
A screen represents a mapping between a TV-client and the schedule, specifying what content is playing on the client. The screen object contains a link to the tv client (clientId) and a link to the schedule rule set scheduleRuleSetId. To fetch all screens for a context, use the following:
GET https://api.thecloudportal.com/api/1/feature/screens/screens?contextId={{contextId}}
The link between a screen and a schedule is called a schedule-rule-set. You can fetch all schedule-rule-sets for a context with the following:
GET https://api.thecloudportal.com/api/1/feature/screens/schedule-rule-sets?contextId={{contextId}}
To move a screen to another schedule-rule-set, do a PUT on the following URL with the correct scheduleRuleSetId:
(Remember that all POST and PUT operations must be complete, so don't skip any fields in the example below. Only the scheduleRuleSetId can be changed on a screen. No other fields can.)
PUT https://api.thecloudportal.com/api/1/feature/screens/screens/{screenId}
{
    "clientId": "<clientId>",
    "clientType": "tv",
    "currentScheduleId": "<scheduleId>",
    "scheduleOverrideId": null,
    "scheduleRuleSetId": "<scheduleRuleSetId>",
    "contextId": "<contextId>"
  }
¶ Client Execute Push Messages
Client Execute Push Messages are a way to send commands to clients registered to sites that you have access to. You may also create API Accounts with a more limited access that can be used to send these messages. To do that, create an API Account using the role 'ClientPush'.
The body of the Client Execute Push Message is as follows:
{
    "clients": Array<string>,
    "messageData": {
        "command": <command>,
        <parameters>
    }
}
It contains a list of client ID's, then the message data with the "command" parameter in the form of a string, then optional parameters for each individual command.
Available client commands and their parameters are listed below:
| command | parameters | Comment |
|---|---|---|
| update-status | null |
Request the display to post its current status to the system. |
| tune-channel | channelId: <string> |
Tunes Client to a specific media channel. Refer to the Media Channels section of the API documentation to see how to fetch list of available Media Channels for a site. |
| set-volume | volume: <int> |
Sets the output volume of the client. If the client has audio muted, the mute will be removed. |
| set-power-on | null |
Powers on the display of the Client unless already powered on. Kept as a separate command from set-power-off since this is a very user-intrusive command that has big side-effects if a bug is introduced. |
| set-power-off | text: <string> |
Powers off the display of the Client unless already powered off. Kept as a separate command from set-power-on since this is a very user-intrusive command that has big side-effects if a bug is introduced. The text parameter is optional and will be displayed to the user if present. |
| reset-softap | null |
Resets a soft access-point on the client if present. |
| reboot | text: <string> |
Reboots the display. If the text element contains a string of length > 0, and the Client is powered on, then the text will be displayed to the user prior to rebooting the device. |
| force-app-update | null |
Request the display to upgrade the application. Different displays have different ways of doing this so user experience will differ from screen type to screen type. A message should be displayed on-screen if the TV is powered on. |
| display-page | pageUrl: <string>, policy: "doPowerOn",params: { <page params> } |
With this command you can instruct the Client to load and display a particular page with the url format: /1/feature/resource-management/tv-menu-pages/(menu-page-id) If the Client is powered off, the policy parameter defines the behaviour. If set to doPowerOn, the Client will be powered on, if not set, the page will be displayed the next time the TV is powered on. Refer to the TV Templates section of the API documentation to see how to fetch a list of available TV templates for a site. |
| display-name | null |
Displays client name on Client. |
| display-message | text: <string>,duration: <int> |
Displays the text text on-screen for duration seconds. Will not power on a powered off Client. |
| display-address | null |
Displays location name on Client. |
| close-page | page-id: <string> |
Closes page with specified id. |
| start-app | { webos: <id>, netcast: <id>, tizen: <id>, orsay: <id>, android: <id> } |
Starts a native application on the device if available. With the exception of a few common apps, the different device types use different ID-schemes. See nativeapps for details. |
| firmware-upgrade | { url: <string>, filename: <string>,version: <string>, bytes: <int>, platform: 'tizen' } |
Install new firmware (Tizen only) |
| set-resolution | { width: <int>, height:<int> } |
Set screen resolution of a signage player to the specified width x height. |
| set-time-offset | { timezone: <string> } |
Set a custom timezone instead of using the site timezone (HD1 and Janus only) |
| remove-time-offset | null |
Remove the custom timezone and reverts to the site configured timezone (HD1 and Janus only) |
| configure-wifi | { ssid: <string>, password: <string>, ssidBroadcasting: <boolean>} |
Connect to WiFi (HD1 only) |
| install-apps | comma-separated text: <string> |
Install/enable the specified apps (LG only) |
| set-ntp-server | url: <string> |
Set custom NTP server to the given URL (Philips only) |
¶ Examples
Set volume on 1 client to 70:
{
    "clients": [
        "<clientId>"
    ],
  	"messageType": "execute",
    "messageData": {
        "command": "set-volume",
        "volume": 70
    }
}
Resets SoftAP on 3 clients:
{
    "clients": [
        "<clientId>",
        "<clientId>",
        "<clientId>"
    ],
  	"messageType": "execute",
    "messageData": {
        "command": "reset-softap"
    }
}
Set power off on 3 clients and display the message "Goodbye!"
{
    "clients": [
        "<clientId>",
        "<clientId>",
        "<clientId>"
    ],
  	"messageType": "execute",
    "messageData": {
        "command": "set-power-off",
        "text": "Goodbye!"
    }
}
Displays template with id "someId" on 2 displays and powers them on
{
    "clients": [
        "<clientId>",
        "<clientId>"
    ],
    "messageType": "execute",
    "messageData": {
        "command": "display-page",
        "pageUrl": "/1/feature/resource-management/tv-menu-pages/someId",
        "policy": "doPowerOn"
    }
}